Herb Reichert returned to the PLX-1000 in July 2015 (Vol.38 No.7):
Within minutes of submitting my review of Pioneer's PLX-1000 turntable for the March 2015 issue, I had second thoughts: I'm new at this magazine. If the PLX-1000 doesn't play better than budget audiophile 'tables, as I said it did, in no time my credibility will be circling the porcelain bowl.
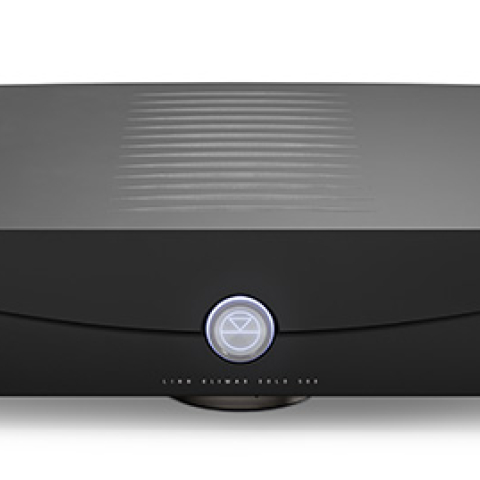
Hoping to avoid shame and insolvency, I began to relisten, rethink, and reevaluate. I played a lot more records, using as many different cartridges and phono stages as I could. I carefully compared the Pioneer to my current in-house references for quality phono playback: Acoustic Signature's WOW XL 'table ($2300, review underway) and TA-1000 tonearm ($1500) with Soundsmith Carmen moving-iron cartridge ($799); and my ancient Thorens TD124 (typically $1200 on eBay) with an Abis SA 1.2 tonearm ($2100) and one of three cartridges—the Zu Denon DL-103 ($399), or Ortofon's SPU CG 25 mono ($999) or the Jasmine Turtle ($710).
What I discovered: The PLX-1000 sounds even more solid, detailed, and natural than I said it was last March. I will stake my reputation on this.
Think of the Chinese-made Pioneer PLX-1000—and its progenitor, the Technics SL1200M2—as the audio equivalents of a Jeep Wrangler. In fact, the SL1200 has much in common with the old Jeep CJ. The venerable Technics is a cult object worldwide for which hundreds of aftermarket parts and upgrades are available; many of these—armboards, tonearms, damping, platter mats, etc.—will fit the PLX-1000.
In Dreams . . .
In case you haven't noticed, I write my "Gramophone Dreams" stories for those of you who may never have owned a black disc or a turntable but are beginning to think, Ahhh, maybe I should haul Dad's old records up from the basement. I wonder if some of those cat-scratched albums will sound good . . . I also write for that even larger group of readers who grew up playing LPs, but abandoned them not long after Tower Records switched exclusively to CDs before going out of business. Many of those audiophiles have moved on to invisible files and pocket players of extreme quality. They're the ones who've dumped their film cameras, their vintage BMWs, their automatic watches. When I get into an old Land Rover Defender with a Nikon F2 hanging off my neck, I see that look of contempt in their eyes. But contempt without reinvestigation leads to only a boring life. This is why I want to add to my Pioneer PLX-1000 review the following observations.
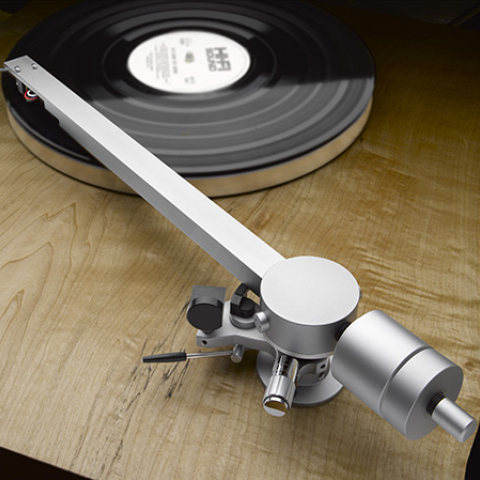
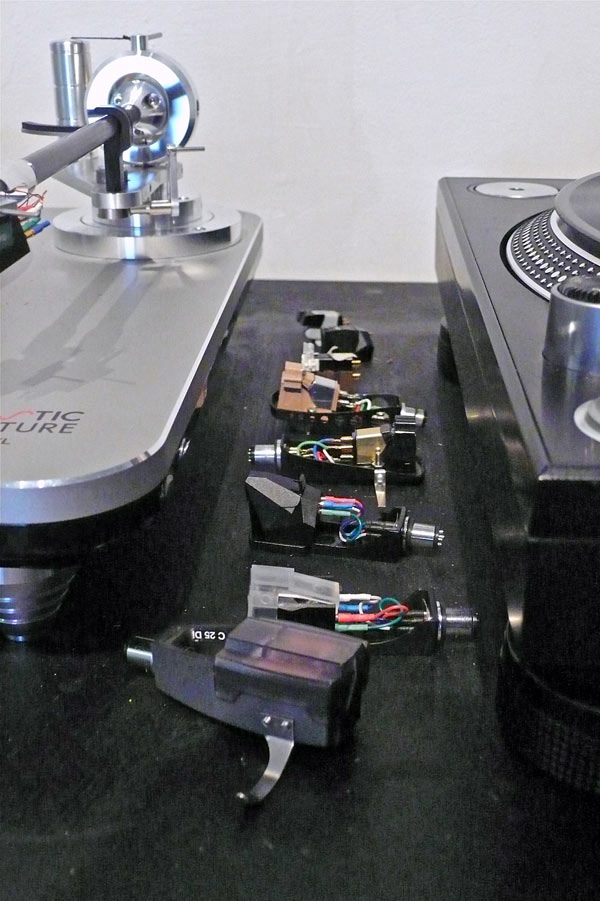
I wrote about this mass-market, direct-drive turntable and tonearm because I wanted to share my discovery of a sturdy new record player that could not only play sophisticated music as well as the VPIs, the Regas, and the Pro-Jects, but could also be something you'd let your brother, your mother, and your kids use. I saw it, too, as the perfect player for record collectors. Most important, it seemed to be a turntable even I could afford. And besides being semi-unbreakable, the PLX-1000 is easy to use. It's especially wonderful if you like to occasionally swap cartridges: You can have a whole row of headshells, each holding a different cartridge, all pre-aligned and ready to go—as I do (see photo below). The swap made, the only adjustment then needed is of the vertical tracking force (and maybe antiskating).
 Easy Work
For me, mounting and aligning cartridges is like changing a car's spark plugs, but most audiophiles aren't comfortable doing the job themselves. The Pioneer PLX-1000 solves that problem. Its headshell is removable, which minimizes mishaps. To attach a new cartridge, you simply remove the headshell from the arm, position the cartridge (with stylus guard in place) over the headshell slots, and snug down the two M2.5 screws and nuts just tight enough so that, with some firm urging, you can move the cartridge slightly. Then, using needle-nose pliers, slip the colored headshell leads onto their pins on the cartridge. (It's best to grasp each female connector just behind the part that slips over the corresponding pin.) Using the overhang template in the Pioneer's owner's manual—or a good ruler—you can now position the cartridge so that the distance from the gasket on the headshell collet to the stylus tip measures precisely 54mm. If you have a good eye for a right angle (90°), now is the time to square up the cartridge body on the headshell—being sure to maintain that 54mm overhang. This simple procedure will get you really close to a perfect Stevenson alignment (which favors classical music because it produces the least amount of distortion in the inner grooves, classical works tending to be louder at the end than at the beginning). Having reinstalled the headshell, you'll be wise to verify this alignment with a protractor—something as solid and effective as my Dr. Feickert Analogue ($300), or as easy and free as the one you print out from the madly addictive website VinylEngine.com.
Dangerous Work
When my review of the Pioneer PLX-1000 appeared, a number of readers protested that I'd let Mike Trei, my good friend and in-house "turntable guru," adjust the PLX-1000's "way loose" arm bearing. It seems that they felt that this looseness was a deal-breaking problem for the Pioneer. It was not. It's really just a problem of buying audio gear online (and is why bricks-and-mortar audio dealers must continue to be supported). Just so's you know: High-quality, hand-assembled tonearms such as my Abis or Acoustic Signature are meticulously built and adjusted at the factory, and will likely never need further tweaking. If they do, you must send them back to the factory or the dealer for adjustment. Low-priced, mass-produced arms are another story. They're made in places where the most important quality control is not to make the arm bearing too tight. (Some DJs prefer a loose arm bearing!) Mass-produced tonearms often have poorly adjusted bearings—it's why I checked the Pioneer's—and most users will never notice. When an arm bearing is too tight, your cartridge will mistrack, and may even skip or not work at all. But . . . You, too, can quite easily adjust the PLX-1000's arm bearings—if you're brave and mechanically minded, and if you're unafraid of voiding your warranty or damaging your tonearm. (Big ifs—consider this a firm WARNING!) First, check them by holding the armtube firmly between fingers and thumb, and try to rotate it as you move it gently up and down. The arm should move with no apparent friction or play, and with no noticeable tightness. If it clicks or rocks—even a little—it needs adjusting. The Pioneer arm has two screws that are easily adjusted with a 2mm slotted screwdriver: one on top (centered on the pivot), for the vertical bearing and one on the side for the horizontal bearing. Adjust these screws very slightly—by just 1° or 2°—until there's no click, no tightness. Remember, a little loose is better than a little tight.
You can verify your efforts by adjusting the arm's counterweight until the arm floats horizontally about 1/2" above the record surface. (Do this with the stylus guard on and antiskating set to "0.") When the arm stops moving and is just floating in air, lift it slightly—say, ½"—and release it. The arm should move effortlessly, and slowly return to its position above the record surface. When it's stopped moving, turn the antiskate adjustment just slightly and watch the arm. It should begin to move freely and easily away from the center of the 'table. If neither of these things happens as I've described, the bearings are too tight. Loosen them a degree, and remember: I warned you not to try this!—Herb Reichert
In case you haven't noticed, I write my "Gramophone Dreams" stories for those of you who may never have owned a black disc or a turntable but are beginning to think, Ahhh, maybe I should haul Dad's old records up from the basement. I wonder if some of those cat-scratched albums will sound good . . . I also write for that even larger group of readers who grew up playing LPs, but abandoned them not long after Tower Records switched exclusively to CDs before going out of business. Many of those audiophiles have moved on to invisible files and pocket players of extreme quality. They're the ones who've dumped their film cameras, their vintage BMWs, their automatic watches. When I get into an old Land Rover Defender with a Nikon F2 hanging off my neck, I see that look of contempt in their eyes. But contempt without reinvestigation leads to only a boring life. This is why I want to add to my Pioneer PLX-1000 review the following observations.
Easy WorkFor me, mounting and aligning cartridges is like changing a car's spark plugs, but most audiophiles aren't comfortable doing the job themselves. The Pioneer PLX-1000 solves that problem. Its headshell is removable, which minimizes mishaps. To attach a new cartridge, you simply remove the headshell from the arm, position the cartridge (with stylus guard in place) over the headshell slots, and snug down the two M2.5 screws and nuts just tight enough so that, with some firm urging, you can move the cartridge slightly. Then, using needle-nose pliers, slip the colored headshell leads onto their pins on the cartridge. (It's best to grasp each female connector just behind the part that slips over the corresponding pin.) Using the overhang template in the Pioneer's owner's manual—or a good ruler—you can now position the cartridge so that the distance from the gasket on the headshell collet to the stylus tip measures precisely 54mm. If you have a good eye for a right angle (90°), now is the time to square up the cartridge body on the headshell—being sure to maintain that 54mm overhang. This simple procedure will get you really close to a perfect Stevenson alignment (which favors classical music because it produces the least amount of distortion in the inner grooves, classical works tending to be louder at the end than at the beginning). Having reinstalled the headshell, you'll be wise to verify this alignment with a protractor—something as solid and effective as my Dr. Feickert Analogue ($300), or as easy and free as the one you print out from the madly addictive website VinylEngine.com.
When my review of the Pioneer PLX-1000 appeared, a number of readers protested that I'd let Mike Trei, my good friend and in-house "turntable guru," adjust the PLX-1000's "way loose" arm bearing. It seems that they felt that this looseness was a deal-breaking problem for the Pioneer. It was not. It's really just a problem of buying audio gear online (and is why bricks-and-mortar audio dealers must continue to be supported). Just so's you know: High-quality, hand-assembled tonearms such as my Abis or Acoustic Signature are meticulously built and adjusted at the factory, and will likely never need further tweaking. If they do, you must send them back to the factory or the dealer for adjustment. Low-priced, mass-produced arms are another story. They're made in places where the most important quality control is not to make the arm bearing too tight. (Some DJs prefer a loose arm bearing!) Mass-produced tonearms often have poorly adjusted bearings—it's why I checked the Pioneer's—and most users will never notice. When an arm bearing is too tight, your cartridge will mistrack, and may even skip or not work at all. But . . . You, too, can quite easily adjust the PLX-1000's arm bearings—if you're brave and mechanically minded, and if you're unafraid of voiding your warranty or damaging your tonearm. (Big ifs—consider this a firm WARNING!) First, check them by holding the armtube firmly between fingers and thumb, and try to rotate it as you move it gently up and down. The arm should move with no apparent friction or play, and with no noticeable tightness. If it clicks or rocks—even a little—it needs adjusting. The Pioneer arm has two screws that are easily adjusted with a 2mm slotted screwdriver: one on top (centered on the pivot), for the vertical bearing and one on the side for the horizontal bearing. Adjust these screws very slightly—by just 1° or 2°—until there's no click, no tightness. Remember, a little loose is better than a little tight.