What hath Leif wrought
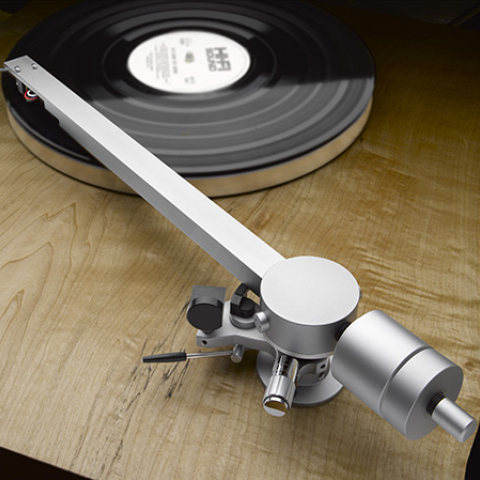
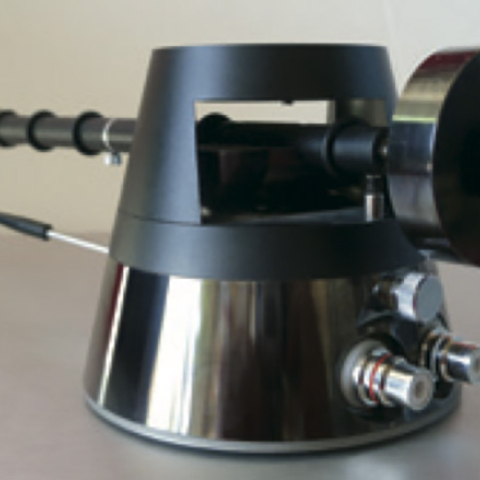
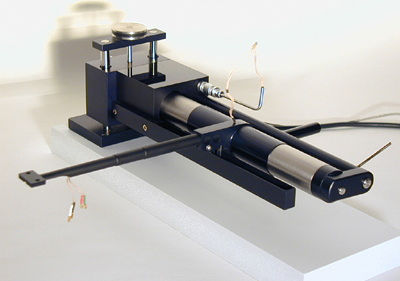
The basic air-bearing mechanism is very simple. First, take a hollow rod and hold it stationary, in a horizontal position. Next, close off one end, and force pressurized air outward through numerous tiny holes drilled radially in the wall of the rod. Now slide a sleeve over it, keeping the clearance between the two pieces to about one thousandth of an inch (25um), and attach an armtube for the cartridge. You're in business (footnote 2). Well, almost. In the Airtangent, one end of the hollow rod is attached to the "mounting tower," a block of acrylic roughly 2½" high and 1½" square. The rod, 6 7/8" long and 1" in diameter, is suspended horizontally as a cantilever. This rod—the air-tube—is the source for the tiny air-streams used to create the air bearing for the sleeve assembly. To maintain the required accuracy and stability, the air-tube is manufactured from titanium. The air holes are not visible to the naked eye. The air can, however, be felt if a hand is placed very close to the tube. The mounting tower is actually in two parts. One half is stationary and bolted to the armboard. The other is free to move vertically, and acts as a central coupling point for all the components comprising the tonearm. A miniature rack-and-pinion gear assembly is provided to move the two pieces with respect to each other. The two pieces are accurately linked by a vertically aligned linear ball bearing, and can be moved with respect to each other with the help of the rack-and-pinion.
The key word here is "vertically"—OK, you guessed it—that's the VTA adjustment. The shaft of the pinion is accessible, and attaches to a lever. VTA changes are effected by rocking the lever, vertically displacing the air-tube and the sleeve-bearing assembly. A locking screw secures the desired position. This couples the two pieces of the mounting tower together, and provides the necessary mechanical integrity for stable playback conditions. The stationary half of the mounting tower fastens to the tonearm board with a ½" bolt. (Even the ½" Allen wrench is provided in the mounting kit.) Torquing this bolt home establishes very solid contact between the two surfaces. But Leif goes beyond this. To avoid rotation of the mounting tower in the horizontal plane, three pointed screws, about 1/8" in diameter, extend through the tower vertically. The points penetrate the surface, anchoring the whole assembly in place.
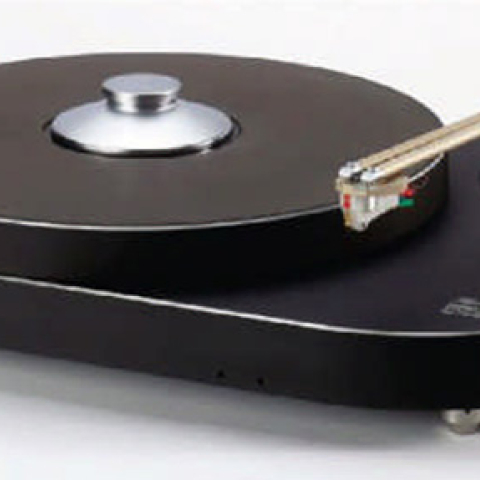
The active parts of the tonearm are attached to the air-bearing sleeve. Here, on the platter side, we find a clamp holding one end of the armtube for the cartridge. This 71/4"-long magnesium armtube does not differ significantly in size from those in ordinary pivoted designs. It's a sleek-looking tapered tube extending over the platter, with a rectangular platform for the cartridge at the end. The other end is gripped by a clamp on the aluminum air-bearing sleeve. This keeps the weight down and the rigidity high. The inside is filled with foam for damping, and to keep the cartridge signal wires from rattling. The clamp is loosened to align the cartridge, thus freeing up the armtube. For overhang, move it along its axis; for azimuth, around it. The settings are locked into place by tightening the clamp. A sliding counterweight on the opposite side of the air-bearing sleeve balances the cartridge and the armtube to provide the required VTF. A couple of weights are supplied, one large, the other smaller, to accommodate a range of cartridges. For the same reason, the armtube comes in two stiffnesses: the standard armtube, and a mechanically bolstered version (optional) for cartridges requiring more rigidity. Leif mentioned the MC-3000 and the Koetsus as candidates for this application.
The cartridge signal passes from the armtube to the mounting tower via Litz wire from a special source. Besides its electrical purpose, this miniature cable is the only mechanical link between the air-bearing sleeve and the outside world. Some very careful positioning of these wires is necessary to avoid drag from this source. The spring action of these tiny wires can seriously impede the virtually frictionless air bearing if not treated with care. These wires are terminated at a miniature Lemo connector which plugs into its mate on the mounting tower. Signals from the arm proper are routed to a pair of Tiffany jacks on an outboard termination box. This interface box also provides a junction point for the vinyl air-supply hose from the pump. (The latest versions also house the circuitry and battery for the cueing mechanism.) The On/Off switch for this mechanism terminates here as well. I found this box very useful, as all external connections—electrical signals or air supply—are conveniently co-located. Leif's thoroughness extends all the way to the air-supply pump. To provide even air flow, the pump includes a reservoir for storing a small volume of pressurized air. The pneumatic nature of air helps smooth out the individual thrusts of the pumping action.
Any way you look at it, the overall result is very impressive. The Airtangent projects a powerful, elegant image. Mounting Excitement
I can't tell you how happy I was to have everything fall into place very smoothly while mounting the Airtangent. I wanted to get the job done quickly and get on with using the tonearm, but I also wanted to savor this process; I seldom handle such refined equipment.
Footnote 2: Of course, there's more than one way to skin a cat. Eminent Technology chooses to hold the sleeve stationary, and allow the rod the to move. The air is supplied to the sleeve. Versa Dynamics has yet another variation: They hold the rod still and move the sleeve, but the air supply is fed to the sleeve via a flexible hose.
The basic air-bearing mechanism is very simple. First, take a hollow rod and hold it stationary, in a horizontal position. Next, close off one end, and force pressurized air outward through numerous tiny holes drilled radially in the wall of the rod. Now slide a sleeve over it, keeping the clearance between the two pieces to about one thousandth of an inch (25um), and attach an armtube for the cartridge. You're in business (footnote 2). Well, almost. In the Airtangent, one end of the hollow rod is attached to the "mounting tower," a block of acrylic roughly 2½" high and 1½" square. The rod, 6 7/8" long and 1" in diameter, is suspended horizontally as a cantilever. This rod—the air-tube—is the source for the tiny air-streams used to create the air bearing for the sleeve assembly. To maintain the required accuracy and stability, the air-tube is manufactured from titanium. The air holes are not visible to the naked eye. The air can, however, be felt if a hand is placed very close to the tube. The mounting tower is actually in two parts. One half is stationary and bolted to the armboard. The other is free to move vertically, and acts as a central coupling point for all the components comprising the tonearm. A miniature rack-and-pinion gear assembly is provided to move the two pieces with respect to each other. The two pieces are accurately linked by a vertically aligned linear ball bearing, and can be moved with respect to each other with the help of the rack-and-pinion.
I can't tell you how happy I was to have everything fall into place very smoothly while mounting the Airtangent. I wanted to get the job done quickly and get on with using the tonearm, but I also wanted to savor this process; I seldom handle such refined equipment.
Footnote 2: Of course, there's more than one way to skin a cat. Eminent Technology chooses to hold the sleeve stationary, and allow the rod the to move. The air is supplied to the sleeve. Versa Dynamics has yet another variation: They hold the rod still and move the sleeve, but the air supply is fed to the sleeve via a flexible hose.