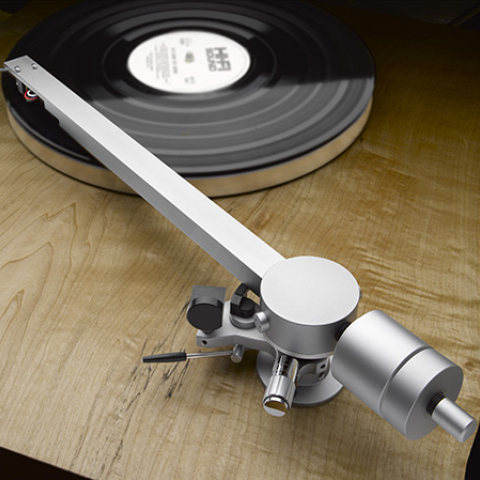
If the sole criterion for choosing a winner in today's hotly contested premium arms race was original thinking, the Immedia RPM-2 might well come out on top. While some of its design details resemble those found on other products, in many significant areas the arm is unique—not for uniqueness's sake, but in order to efficiently implement some clearly considered goals. If the unipivot RPM-2 bears a resemblance to any other contemporary arm, it is Naim's highly regarded ARO—which I've never heard. The similarity, though, would appear to be superficial.
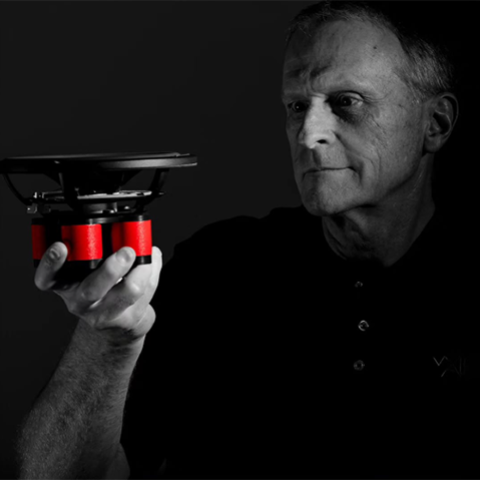
 In designing his unipivot, one-time SOTA employee Allen Perkins (largely responsible for the design of the SOTA Cosmos turntable) began with some clearly defined objectives: structural rigidity, minimum geometric error in all planes of play, careful preservation of the minute electrical signal, and, most critically, the efficient dissipation of unwanted mechanical energy. These are goals shared by most arm designers, though sometimes other considerations—such as convenience, compatibility, and ergonomics—can cause a clash.
Rigidity and the efficient evacuation of energy were the starting points for Perkins's design. As the LP groove is dragged past the stylus, the cartridge converts mechanical energy into electrical energy. An arm's bearing system must be loose enough to allow the stylus unimpeded movement in both vertical and horizontal dimensions, yet rigid enough to prevent the forces unleashed by this violent mechanical interface from tossing the arm around—the "tail wagging the dog" effect. Clearly, achieving a proper balance between these seemingly conflicting objectives is extremely difficult.
No matter how successful the bearing design, excess mechanical energy is generated which must be controlled and/or dissipated. Various combinations of mass, mechanical stiffness, and damping are used in all tonearms to rid the systems of unwanted energy, either by absorbing (damping) it and turning it into heat, or by evacuating it via a path to "ground," where it is again turned into heat. Failure to deal with this errant energy results in vibrational reflections and resonances that remain in the system and find their way back to the stylus, where they can color the tonal balance and smear the sound.
Basics
In designing his unipivot, one-time SOTA employee Allen Perkins (largely responsible for the design of the SOTA Cosmos turntable) began with some clearly defined objectives: structural rigidity, minimum geometric error in all planes of play, careful preservation of the minute electrical signal, and, most critically, the efficient dissipation of unwanted mechanical energy. These are goals shared by most arm designers, though sometimes other considerations—such as convenience, compatibility, and ergonomics—can cause a clash.
Rigidity and the efficient evacuation of energy were the starting points for Perkins's design. As the LP groove is dragged past the stylus, the cartridge converts mechanical energy into electrical energy. An arm's bearing system must be loose enough to allow the stylus unimpeded movement in both vertical and horizontal dimensions, yet rigid enough to prevent the forces unleashed by this violent mechanical interface from tossing the arm around—the "tail wagging the dog" effect. Clearly, achieving a proper balance between these seemingly conflicting objectives is extremely difficult.
No matter how successful the bearing design, excess mechanical energy is generated which must be controlled and/or dissipated. Various combinations of mass, mechanical stiffness, and damping are used in all tonearms to rid the systems of unwanted energy, either by absorbing (damping) it and turning it into heat, or by evacuating it via a path to "ground," where it is again turned into heat. Failure to deal with this errant energy results in vibrational reflections and resonances that remain in the system and find their way back to the stylus, where they can color the tonal balance and smear the sound.
Basics
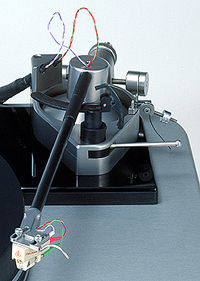
Perkins first sought a direct mechanical connection from tonearm to "ground"; his design begins with a threaded brass post which screws into the armboard or plinth via a tapped hole. A polished, synthetic sapphire cup set into a hollow atop the post forms the "female" component of the unipivot bearing. In other words, there is a direct connection between the arm bearing and mechanical ground. I know of no other contemporary arm that accomplishes this. Of course, a single post embedded in acrylic or MDF does not exactly constitute a rigid connection, so the post is supported by an almost 3"-tall shaft machined into a large, massive, flat-bottomed hunk of stainless steel that serves as arm base, damping-fluid reservoir, and cueing-lever support. The sizable flat contact area between the Immedia RPM-2's bearing/base assembly and the armboard or plinth creates a rigid mechanical interface. The base and brass post are snugged down onto the mounting surface by a brass nut, which fits over the post and tightens down onto the top surface of the base shaft. Since the top of the brass post is fitted with the bearing cup, before securing the assembly with the nut, you are instructed to line up the bearing surface with the top of the platter using a straight edge: Just screw the post up or down until it is precisely lined up, then tighten the nut with the flat wrench included with the RPM-2.
A call to arm
The arm assembly consists of a headshell, main armtube, and outer armtube set into a heavy, cylindrical housing machined from solid stainless steel, and radically flared at the bottom for added weight and stability. A decoupled counterweight shaft set below the pivot point protrudes from the rear. The arm's effective length from pivot point to stylus tip is 254mm, or 10". Installing the arm atop the bearing post is complicated somewhat by the Discovery wiring harness—one continuous length running from the cartridge pins to the RCA plugs. The wires run the inside length of the armtube, exiting a hole drilled into the top of the stainless-steel pivot assembly. From there they continue unshielded for another 4" or so, finally terminating in a rubber/metal junction followed by a 3' shielded run ending in the RCA plugs. Because the shielded section is heavy and stiff, and there is no immediate strain relief for the exposed unshielded section, failure to exercise care here can result in serious damage to the wiring harness. Placing the arm atop the bearing post and aligning the male and female parts is easy. The hard part is doing so while controlling the shielded wire, which wants to explode out of your hand and sever its connection with the arm.
Of course, there is strain relief, both to keep the wire in one piece and to form the loops necessary for unimpeded arm movement. The tubular rubber/metal junction sections of the harness fit under cutouts in a neatly devised clamp fitted to the left-hand back corner of the base, which tightens via a hex-head screw. Once secured, the screw can be slightly loosened so you can untwist the loops and optimize their arcs. Then you'd better remember to tighten the sucker down again!
At this point the assemblage of parts finally begins to look like a functioning tonearm. The stainless-steel headshell, neatly machined to reduce mass, is press-fitted (footnote 1) and glued to the rigid armtube (aluminum under baked-on carbon-fiber weave) with a quick-setting (10 seconds), high-tech adhesive, which serves only to fill in minute air spaces between the press-fit pieces. The other end of the tube is press-fitted and glued into an outer aluminum tube, itself press-fitted and glued into the stainless-steel bearing housing. Note that, for added mechanical rigidity, the main armtube runs the entire length of the outer armtube—all the way to the center bearing.
Footnote 1: In this and other arms—such as VPI's JMW Memorial—"press-fit" refers to parts that have to be put in a mechanical press to be mated, so tight are the tolerances, not because some guy presses one part into the other with his hands!
In designing his unipivot, one-time SOTA employee Allen Perkins (largely responsible for the design of the SOTA Cosmos turntable) began with some clearly defined objectives: structural rigidity, minimum geometric error in all planes of play, careful preservation of the minute electrical signal, and, most critically, the efficient dissipation of unwanted mechanical energy. These are goals shared by most arm designers, though sometimes other considerations—such as convenience, compatibility, and ergonomics—can cause a clash.
Rigidity and the efficient evacuation of energy were the starting points for Perkins's design. As the LP groove is dragged past the stylus, the cartridge converts mechanical energy into electrical energy. An arm's bearing system must be loose enough to allow the stylus unimpeded movement in both vertical and horizontal dimensions, yet rigid enough to prevent the forces unleashed by this violent mechanical interface from tossing the arm around—the "tail wagging the dog" effect. Clearly, achieving a proper balance between these seemingly conflicting objectives is extremely difficult.
No matter how successful the bearing design, excess mechanical energy is generated which must be controlled and/or dissipated. Various combinations of mass, mechanical stiffness, and damping are used in all tonearms to rid the systems of unwanted energy, either by absorbing (damping) it and turning it into heat, or by evacuating it via a path to "ground," where it is again turned into heat. Failure to deal with this errant energy results in vibrational reflections and resonances that remain in the system and find their way back to the stylus, where they can color the tonal balance and smear the sound.
Perkins first sought a direct mechanical connection from tonearm to "ground"; his design begins with a threaded brass post which screws into the armboard or plinth via a tapped hole. A polished, synthetic sapphire cup set into a hollow atop the post forms the "female" component of the unipivot bearing. In other words, there is a direct connection between the arm bearing and mechanical ground. I know of no other contemporary arm that accomplishes this. Of course, a single post embedded in acrylic or MDF does not exactly constitute a rigid connection, so the post is supported by an almost 3"-tall shaft machined into a large, massive, flat-bottomed hunk of stainless steel that serves as arm base, damping-fluid reservoir, and cueing-lever support. The sizable flat contact area between the Immedia RPM-2's bearing/base assembly and the armboard or plinth creates a rigid mechanical interface. The base and brass post are snugged down onto the mounting surface by a brass nut, which fits over the post and tightens down onto the top surface of the base shaft. Since the top of the brass post is fitted with the bearing cup, before securing the assembly with the nut, you are instructed to line up the bearing surface with the top of the platter using a straight edge: Just screw the post up or down until it is precisely lined up, then tighten the nut with the flat wrench included with the RPM-2.
The arm assembly consists of a headshell, main armtube, and outer armtube set into a heavy, cylindrical housing machined from solid stainless steel, and radically flared at the bottom for added weight and stability. A decoupled counterweight shaft set below the pivot point protrudes from the rear. The arm's effective length from pivot point to stylus tip is 254mm, or 10". Installing the arm atop the bearing post is complicated somewhat by the Discovery wiring harness—one continuous length running from the cartridge pins to the RCA plugs. The wires run the inside length of the armtube, exiting a hole drilled into the top of the stainless-steel pivot assembly. From there they continue unshielded for another 4" or so, finally terminating in a rubber/metal junction followed by a 3' shielded run ending in the RCA plugs. Because the shielded section is heavy and stiff, and there is no immediate strain relief for the exposed unshielded section, failure to exercise care here can result in serious damage to the wiring harness. Placing the arm atop the bearing post and aligning the male and female parts is easy. The hard part is doing so while controlling the shielded wire, which wants to explode out of your hand and sever its connection with the arm.
Footnote 1: In this and other arms—such as VPI's JMW Memorial—"press-fit" refers to parts that have to be put in a mechanical press to be mated, so tight are the tolerances, not because some guy presses one part into the other with his hands!