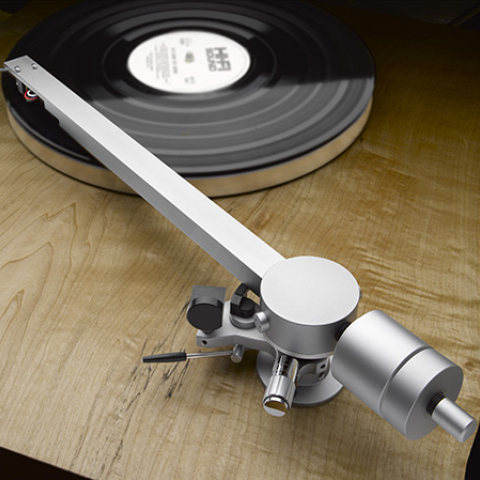
For heads-up installation, hold the arm or headshell upright with the cartridge in place under it, and drop a screw through one pair of holes. The tricky part, now, is attaching the nut, because this may be so close to the cartridge body that there's no room to get a finger grip on it, or even to accommodate a small nut driver. Here's where the spaghetti tubing comes in. Select a length of this that's just big enough to allow you to force the nut inside the tip of it. This is easier if you put the nut on the tabletop and press the tubing down onto it. Then use the tubing to hold the nut while you use the screwdriver to start the screw into it. Install the second screw and nut the same way, align the cartridge parallel with the headshell axis, then take up both of them until they're as tight as you can get them using only finger force on the screwdriver. (You may need the spaghetti to prevent the nuts from turning.) Don't overtighten the nuts as the cartridge still has to be shifted around in the headshell to ensure the optimum alignment. If for any reason you should need to attach a screw to the screwdriver, wipe its head on a bar of soap. Assembly and leveling
The tonearm, with cartridge attached, should now be reinstalled on the turntable armboard and the complete player placed on its support. Don't worry about getting the exact arm height correct; just ensure that the armtube, assuming that it is straight, not tapered, is approximately parallel to the record surface. The next step is to ensure that the turntable is level. Choosing a suitably horizontal part of the player's chassis, place the spirit level on it and adjust the turntable support or table so that the player is approximately level. Next, put a very flat disc on the platter, add the disc stabilizer weight (if any)—do not clamp it down—and place the spirit level in the middle of the grooved area. Then follow the 'table manufacturer's instructions for leveling the platter/subchassis.
(How do you tell if a disc is flat? Put it on a tabletop and ascertain that its entire rim just barely touches the table. Flip it upside down and recheck it, to make sure it isn't dished.) Leveling is a straightforward procedure when there are three suspension springs, but becomes more complicated when there are four. In the latter case, you must try to match the vibrating periods of all four springs, otherwise the suspension will be diagonally unstable. The trick is to limit your adjustments to two adjacent pairs of springs, going first for leveling, then for balance. You can check balance by depressing the suspension at a point between two springs and releasing it, then repeating this between the adjacent pair. The periods of vibration should be as close as you can get them (footnote 8). If the suspension seems underdamped—that is, if it jiggles for a prolonged period when excited (like a lady I used to date)—stuff the inside of each spring with any soft, compliant material: tightly wadded knitting wool or ultra-pliant foam plastic, for example. Friction between this and the spring coils will damp the suspension. On the other hand, adding too much stuffing to the springs will destroy the suspension's efficacy at filtering out vibration.
Heavy cartridge cables can provide an unwanted vibration path from an otherwise well-isolated suspension system to the underlying shelf, impairing the 'table's feedback immunity. Such cables should, at the very least, be looped inside the turntable base and then attached to an unsuspended part of it (fig.2). Better still, if the cables plug into the arm base, they should be replaced at that point by an isolation/junction box. This attaches to the unsuspended part of the turntable base, and provides very light cabling between the box and the arm receptacle(s). Outputs from the box are RCA receptacles, so you can use regular (high-grade, of course) interconnects between it and the preamp. Music and Sound Imports, The Mod Squad, and Sumiko sell such boxes.  Fig.2 A heavy tonearm cable should be looped inside the turntable base to reduce vibration transmission to the suspended platform. Cartridge alignment
Place the tangency template or jig on the disc surface. (Stereophile has long recommended the db Systems template—see the postscript for the address.)
Most arms have elongated holes, either at their base or more commonly on the headshell, for tangency adjustment. If yours does, loosen their locking screws or nuts. If it doesn't, you will have to rotate the cartridge (in the horizontal plane) to change its tangency. Loosen its mounting screws just enough to allow you to rotate it slightly back and forth, but not enough to make for a loose fit. With a pivoted arm, adjust the cartridge to obtain equal and opposite tangency errors at the two test positions indicated on the template, and retighten the screws. Use only finger torque. There will always be some error with a pivoted arm; with a straight-line-tracking arm, there should be absolutely none from the label to the lead-in groove.
Now, if the disc stabilizer is a clamping type, lock it down. Place the mirror on the disc surface, in the middle of the grooved area that the stylus will traverse, and lower the stylus onto it. Make sure the corners of the mirror are clear of the raised parts of the disc (label, outer edge).
Footnote 8: A codicil to Murphy's Law means that the first time you go through this procedure with a belt-drive turntable, when the subchassis and platter are both level and floating optimally, the belt will no longer ride correctly on the crown of the drive pulley. Start again. For those with a turntable whose platter proper rides on a subplatter driven by the belt—Linn, Thorens, AR—inverting the platter for the preliminary part of this process means that you can ensure that your major suspension adjustments are not destroying the relationship between the platter, the belt, and the drive pulley. You can then fine-tune the suspension with the platter the right way 'round with the LP and clamp, if any.—JA
The tonearm, with cartridge attached, should now be reinstalled on the turntable armboard and the complete player placed on its support. Don't worry about getting the exact arm height correct; just ensure that the armtube, assuming that it is straight, not tapered, is approximately parallel to the record surface. The next step is to ensure that the turntable is level. Choosing a suitably horizontal part of the player's chassis, place the spirit level on it and adjust the turntable support or table so that the player is approximately level. Next, put a very flat disc on the platter, add the disc stabilizer weight (if any)—do not clamp it down—and place the spirit level in the middle of the grooved area. Then follow the 'table manufacturer's instructions for leveling the platter/subchassis.
Fig.2 A heavy tonearm cable should be looped inside the turntable base to reduce vibration transmission to the suspended platform. Cartridge alignment Place the tangency template or jig on the disc surface. (Stereophile has long recommended the db Systems template—see the postscript for the address.)
Footnote 8: A codicil to Murphy's Law means that the first time you go through this procedure with a belt-drive turntable, when the subchassis and platter are both level and floating optimally, the belt will no longer ride correctly on the crown of the drive pulley. Start again. For those with a turntable whose platter proper rides on a subplatter driven by the belt—Linn, Thorens, AR—inverting the platter for the preliminary part of this process means that you can ensure that your major suspension adjustments are not destroying the relationship between the platter, the belt, and the drive pulley. You can then fine-tune the suspension with the platter the right way 'round with the LP and clamp, if any.—JA