This story originally appeared at InnerFidelity.comSomething had to give: Tyll has given me the assignment of evaluating a bunch of midprice phones. But I feel that the amps I have to drive them are not completely up to the task. The Burson Soloist is fun, punchy and “tubey”. The O2 sounds comparatively transparent and is a great bargain, but how would it compare to the big guys? So I knew I needed to include a transparent high class amp to drive and test these phones. But Mary would divorce me if I proposed buying yet another expensive headphone amp. Instead I found a solution: Build one instead. The process has proved to be very rewarding in all respects. Let me tell you about it here.
The amp I decided to build is the AMB M³ (aka the “M³,” or “M cubed”). It’s a highly respected DIY project designed by the team of ever-generous Ti Kan, steward of AMB laboratories (who’s been serving up delicious audio DIY projects for many years), and the mysterious Morsel. Tyll has talked it up as well as hundreds of audiophiles before me. Building it I learned a lot; in fact I couldn’t have built this amp if not for the excellent instructions at the AMB site, with its forum and direct answers from Ti himself. I also have my good friend and analog guru, John Chester, who gave me a pointer that has made this a uniquely-featured M³ that no one else has ever made, a reversed-bias opamp (more about that below).
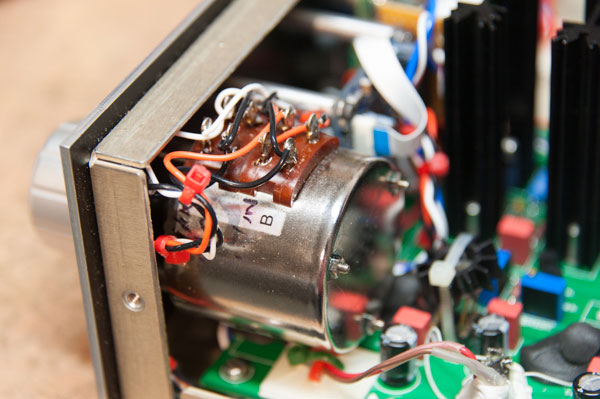
Since I have saved thousands of dollars on the retail cost of the equivalent commercial amp (if there is an equivalent), I spared no expense on any parts that could affect the sound of my M³. The first refinement is a classy TKD 1 dB/step switched resistor attenuator. I’ve been constructing stepped analog attenuators for years, to avoid the slight distortion that comes from ordinary potentiometers which wipe a contact across a continuous resistive element. This time I used a ready-made part which I already had on hand, a work of art hand assembled by Japanese elves: It contains precision resistors and gold contact switches, precisely selected so each step has an error less than 0.05dB. The works reside inside an impressive metal can equipped with fine stepped gears. I paid around $250 for it over ten years ago from Michael Percy Audio, who no longer carries the part. I can’t find a dealer for this part anymore. Audiophiles, here you go — an amplifier made from real unobtanium! It sounds subtly better than any standard potentiometer, plus the stepped attenuator gives me changes defined in dB, not in arbitrary numbers, and permits a repeatable return to any position — useful for evaluating components with different sensitivities. When the pot says 0 dB, the amplifier is at exactly unity gain. Here’s a photo of this high resolution attenuator in place:
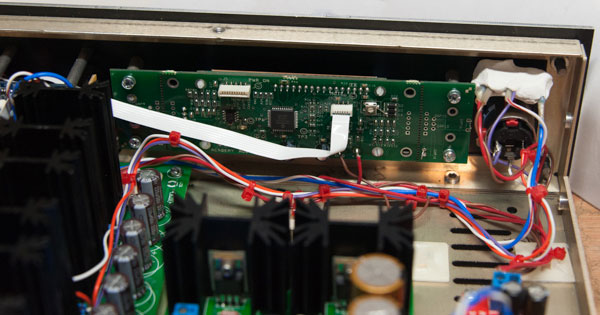
The power transformers are located in a separate chassis for zero hum field induction. I used the recommended “Sigma 11” power supply, configured it to produce 36 volts DC, which is real overkill, but this gave me peace of mind. It’s so well regulated that I can reduce the incoming AC line to 99 volts without losing any regulation. The power supply has plenty of instantaneous juice to spare for momentary transients which I believe contributes to the amplifier’s amazing microdynamics and feeling of having infinite headroom. It has impressive impact and punch that never give up. Do we call that “dynamic headroom”? How do you measure for that? The opamps are powered with 34 volts (+ and – 17) which is near their maximum rating, safe, but giving maximum headroom as well. Here’s an inside photo:
Since I now have a laboratory-grade preamplifier and headphone amplifier on hand, it would pay to carpe diem. So as an experiment I decided to see if a set of precision resistors in an integrated circuit, switched by CMOS (solid state) switches, could sound good. The Muses volume control chip, made by New Japan Radio, has been made famous in audiophile circles by Nelson Pass, who uses this as a remote volume control in his preamps. The irony is that the ultimate couch potato is someone with a remote controlled headphone amp! But seriously, I also engineered this amp as a preamp, and it can be remote controlled from a distance. Mostly I was interested in finding out the sound quality of this chip. If the Muses chip turns out to have acceptable sound, it would simplify the construction of audiophile-quality multichannel amps. The economics of switched analog attenuators would change once more, although this chip is priced at $25 each in small quantities, just for a stereo connection. (Insert unhappy face). But still I wanted to hear the chip for myself. I discovered that a company called Academy Audio, http://www.academyaudio.com/ has engineered this chip and several possible controllers for diyers like me, contacted Academy and purchased their “VCM” mini volume control and LCD control board. They’ve been very nice and their installation manual and theory of operation are thorough. Note that the Muses volume control chip contains two different calibrated potentiometers: an input attenuator and a second pot designed to raise the gain of an opamp up to +31.5 dB in 0.5 dB steps. I am only using the attenuator section, preferring to use a simple gain switch on the OPA 627, either unity or +10 dB.
To spoil the suspense, let me tell you right now that this digitally-controlled attenuator has surpassed my expectations: It doesn’t appear to have a sound at all! I spent hours switching back and forth between the TKD and the Muses attenuator at matched levels and not once could I perceive a difference. It sounds entirely transparent to me at any degree of attenuation. If you get the opportunity to make the same comparison and you think you hear a difference, make sure you switch carefully, over and over, because at the moment of switching it’s easy to confuse changes in the music with changes in the sound. I wager if you perform a fair, long-term comparison, you will reach the same conclusions as I: This attenuator is sonically transparent. Or if you hear a difference and can pass a blind test, I bet it will be the smallest possible difference you can imagine.
The Muses project was an extravagance, but a great educational experience. It was fun to build this digital/analog attenuator combination into my amp. After all that work, mostly now I use the Muses as a dim switch! By the way, if you want to be a complete purist, AMB offers a DIY project with a digitally-controlled relay-switched ladder attenuator. Here are some photos:
The output devices are high current Mosfets, which seem to have a sweeter sound quality than bipolar transistors. I first encountered Mosfets in my Hafler 250, which still sounds pretty nice today. Visible clipping point of the amp is about 2 dB above 7 volts RMS with a 1 kHz sine wave, so 7 volts (2.45 watts) is a safe description of the amp’s maximum clean output, which I’ve tested and confirmed into 20 ohms (the impedance of the LCD-X).
Since I’m a Class A freak, I wanted to have the maximum possible Class A bias without overheating the Mosfets, which turns out to be 105 ma quiescent current when the amp is fully closed and heated to its maximum permissible temperature. This would permit Class A operation up to 210 ma through a load. That’s “only” 0.882 watts into 20 ohms, above which the amplifier drops out of Class A operation. If we dare, that would produce 132.4 dB peak SPL with the Audeze phones so it’s safe to say this is a Class A amplifier for all practical purposes! There’s plenty of Class A headroom for those sweet Mosfet peaks.
The Sound
In the next episode I’ll give you all my measurements, including comparisons of the Muses attenuator versus the TKD, assuming there are measurable differences. Let’s talk about this amp’s fabulous sonics. As the builder, I’m proud of my baby and I’ll admit I’m officially biased, but I’ve built a few preamps and amps in my day and some of them have sucked so I’d like to think I’m pretty objective. In a previous episode I waxed rhapsodic over the JDS labs O2 amp, saying that I’d like to pit it against a high priced contender. Well, they warned us in the 1918 song: “How you gonna keep ‘em down on the farm after they’ve seen Paree?” The M³ is haute cuisine — it eats up the O2 for déjeuner, petit déjeuner and dîner! In comparison, the O2 sounds murky, flat (undynamic) and without bass definition. So let’s call the O2 what it is: a middleweight contender, maybe not even a middleweight champ but I don’t know enough middleweights to know for sure. Likewise, the M³ is definitely a heavyweight contender. Maybe after Big Sound 2015 we’ll know if it’s a heavyweight champion.
Dynamically, the M³ brings the Audeze in line with the Stax/KGSS. I never thought I would be saying that. “It’s the amp, stupid!” Perhaps it’s the superior control of the M³’s 0.2 ohm output impedance or its incredible dynamic headroom, but I’m impressed. Now I own two premium heavyweight amplifiers. In fact, more visitors are preferring the Audeze experience to the Stax over here, about 4 out of 5. I now prefer the Audeze/M³ to the Stax/KGSS for the sheer listening pleasure and the hair-raising experience, though I have not yet evaluated whether the M³ turns the Audeze into a microscope like the Stax. The experience is certainly very transparent yet pure and punchy. It has superior macro- and micro- dynamics to the competing dynamic amps and equal to the KGSS. What I mean is that crescendos and decrescendos are bigger and the transient impact of percussive sounds more authentic and impacting. I love it!
The M³ has a fabulous soundstage. In fact, the width, depth and quality of the Audeze/M³ soundstage are in the same league as the Stax/KGSS. I had previously blamed the Audeze for a weaker soundstage, but really the issue was the amp I was pairing it with. If other readers who have built an M³ and a KGSS don’t feel the same way I do, then I urge you to change your opamps, use a higher voltage power supply and replace the volume control, because these could make the difference. Now both the electrostatic and Planar-magnetic image about as wide and big, and both have a similar holographic quality.
This amp is addictive! I’ve spent hours revisiting all my favorite recordings and lots of new ones, just listening for pleasure. I never spent as much time with my Stax amp when I first got it! I haven’t had this much listening pleasure with a piece of gear in a long time. The first thing I noticed is that the bottom end of the M³ goes down to the center of the earth, and that even the tiny bass boost I had been applying digitally for listening with the two other amps is no longer necessary. So the bottom end EQ is now flat. Bass instruments and bass drums are perfectly defined and extended, dynamic and well controlled. You can hear and identify each bass note, which is not the case with the O2 or the Burson.
The M³ is so open, extended and pure that I have removed the 7 kHz dip EQ. Its high end is, to say the least, unfatiguing. Previously I had been dipping around 7k to deal with a bit of an edge I perceived in the Audeze but with the M³ I feel that EQ is no longer necessary. Perhaps it’s because of the sweetness of the Mosfets or that this is just a more linear and dynamic amplifier. Regardless, that EQ is now flattened. Is this because the M³ is flattering or that the previous amps are harsh in that region? Regardless, EQ is now flat up to 10 kHz above which it begins to gently rise: The one remaining band is a 1.97 dB shelving boost at 22 kHz since the LCD-X definitely can use some “air”, regardless which amp drives them. I reduced the bandwidth of that 22 kHz boost so it begins above 10 kHz, because I can detect even the slightest effect in the 10 kHz region with the M³ amp. This helps them compete fairly with the Stax, and in fact I feel the Stax now sound comparatively thin in comparison so maybe it’s time to experiment with a tiny downward HF shelf for the Stax, perhaps only 0.1 dB at 20 kHz will be enough.
This amp has everything: Musicality, power (the wow factor), dynamics, clarity, soundstage, and fun. Highly recommended for DIYers. Total cost of parts, with the case, but not counting the custom front panel or the TKD or Muses attenuators, is a measly $350 or less. If you are not a DIYer, then hopefully Tyll and I will be able to nominate a commercial amp that can do equal justice to sources, but expect to pay thousands of dollars more for equal sonic value.
TKD 1 dB/step potentiometer
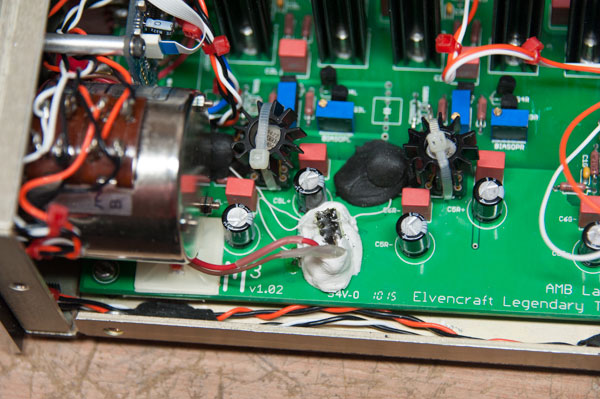
The next refinement was a precision relay-switched amplifier gain control. I chose either 0 dB (unity) or +10 dB, which should handle most range of headphones. Although some might choose a higher maximum gain, I tend to use DACs with a higher output level so +10 should do the trick for me when playing high impedance/low sensitivity cans. This amp has such resolution that I felt I could hear a difference between +10 dB and 0 dB gain, which I can validly compare because I can attenuate the input by exactly 10 dB and switch in the gain. To my ears, the opamp sounds a little less dimensional, “flatter” at the higher gain. It’s very subtle and I might not pass a blind test on this one, but it convinced me to use unity gain whenever possible. Needless to say, this amp is totally silent even at its full gain, even with a high quality DAC connected and using very sensitive Audeze cans. Here’s a photo of the relay “dead-bugged” to the PC board — the elements which affect the gain of the opamp are placed as close as possible to the opamp:
Dead-bugged gain relay encased in protective white “Sugru”
The relay is encased in white “Sugru”, a cool rubberized glue that keeps it from damage and adheres it to the board. The black lumps are black Sugru to anchor a couple of resistors which are sitting vertically to accommodate the gain mod. Also in view are my opamp pride and joys: Burr Brown OPA 627’s in metal cans with heatsinks. These are among the finest IC opamps made, with lowest distortion and noise, and extreme immunity to input impedance variations. They are quite stable in their sockets, but I added wire ties to prevent them coming loose no matter how hard the amp might be shaken. My friend John Chester, who has designed professional-grade tape head preamps, brought up the point that the topology of the opamp should determine whether bias current flowing into or out of the opamp sounds better. John recommended that the 627 sounds better to his experience biased into class A with a reverse DC polarity than the standard circuit in the M³. After I performed the surgery (9 painful board cuts and jumps) I listened and I believe I heard a slightly more cohesive sound, but it’s a subtle improvement.
Power to spare
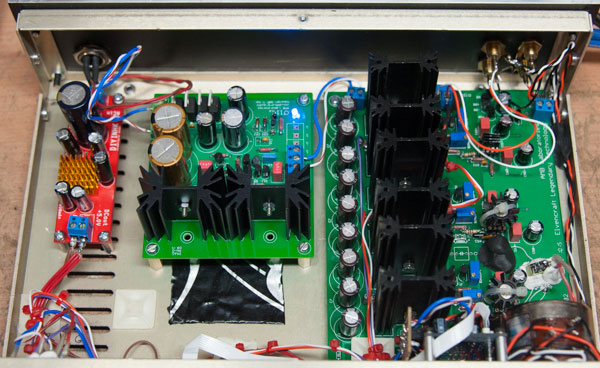
The power transformers are located in a separate chassis for zero hum field induction. I used the recommended “Sigma 11” power supply, configured it to produce 36 volts DC, which is real overkill, but this gave me peace of mind. It’s so well regulated that I can reduce the incoming AC line to 99 volts without losing any regulation. The power supply has plenty of instantaneous juice to spare for momentary transients which I believe contributes to the amplifier’s amazing microdynamics and feeling of having infinite headroom. It has impressive impact and punch that never give up. Do we call that “dynamic headroom”? How do you measure for that? The opamps are powered with 34 volts (+ and – 17) which is near their maximum rating, safe, but giving maximum headroom as well. Here’s an inside photo:
Inside the amp: At left, 5 volt supply for the Muses attenuator (see text), In the middle, high current, high headroom Sigma 11 power supply, at right, the main PC board.
At left (red board) you can see the extremely low noise 5 volt regulator I purchased from DIYNHK, a Hong Kong company worth taking a look at: http://www.diyinhk.com/shop/. This is used to power the Muses remote-controlled attenuator which I’ll talk about in a moment. In the middle is the Sigma 11 power supply, and at right the main PC board, equipped with 2-1/2 inch heatsinks that permit me to run a very high class A bias without overheating the output devices, which do not exceed a quiescent Mosfet temperature of 64 degrees C. Riddle: Who can identify the black and silver thing stuck under the power supply? Hint: If you work on car stereos you might recognize this.
Amusing The Masses
Since I now have a laboratory-grade preamplifier and headphone amplifier on hand, it would pay to carpe diem. So as an experiment I decided to see if a set of precision resistors in an integrated circuit, switched by CMOS (solid state) switches, could sound good. The Muses volume control chip, made by New Japan Radio, has been made famous in audiophile circles by Nelson Pass, who uses this as a remote volume control in his preamps. The irony is that the ultimate couch potato is someone with a remote controlled headphone amp! But seriously, I also engineered this amp as a preamp, and it can be remote controlled from a distance. Mostly I was interested in finding out the sound quality of this chip. If the Muses chip turns out to have acceptable sound, it would simplify the construction of audiophile-quality multichannel amps. The economics of switched analog attenuators would change once more, although this chip is priced at $25 each in small quantities, just for a stereo connection. (Insert unhappy face). But still I wanted to hear the chip for myself. I discovered that a company called Academy Audio, http://www.academyaudio.com/ has engineered this chip and several possible controllers for diyers like me, contacted Academy and purchased their “VCM” mini volume control and LCD control board. They’ve been very nice and their installation manual and theory of operation are thorough. Note that the Muses volume control chip contains two different calibrated potentiometers: an input attenuator and a second pot designed to raise the gain of an opamp up to +31.5 dB in 0.5 dB steps. I am only using the attenuator section, preferring to use a simple gain switch on the OPA 627, either unity or +10 dB.
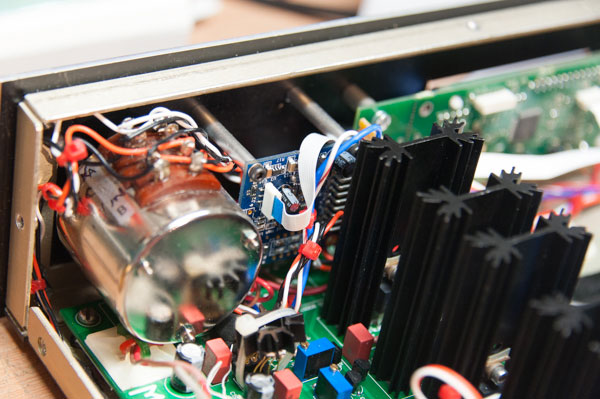
David vs. Goliath. On the left, the mammoth TKD switched attenuator, next to the tiny blue Academy Audio Muses analog potentiometer board.
The long green board from Academy audio contains the LCD display, digital control circuitry and infrared sensor. The white jumper sends the control signals to the analog potentiometer board.
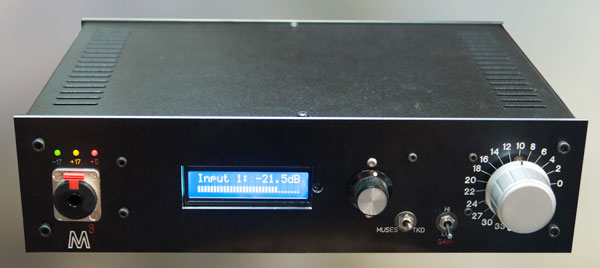
I decided to go full tilt boogie: design and have machined a custom front and rear panel to complement this beautiful amp. In the next photo, on the left side of the front panel you can see the locking Neutrik headphone jack and indicators for the power supply voltages. In the middle, the display of the Muses attenuator with a little hole to expose the IR sensor. To the right of that is a direct rotary encoder for Muses volume, input select, and balance, in case you misplace the IR remote. In this build I am not using the input select feature, but Academy audio makes an optional relay board that can be used to select inputs. Then a switch to choose either the Muses or the TKD attenuator, followed by the gain switch and the 1 dB/step (for the top 25 steps) TKD switched resistive attenuator.
Bob’s M³ build
Magic Mosfets
The output devices are high current Mosfets, which seem to have a sweeter sound quality than bipolar transistors. I first encountered Mosfets in my Hafler 250, which still sounds pretty nice today. Visible clipping point of the amp is about 2 dB above 7 volts RMS with a 1 kHz sine wave, so 7 volts (2.45 watts) is a safe description of the amp’s maximum clean output, which I’ve tested and confirmed into 20 ohms (the impedance of the LCD-X).
In the next episode I’ll give you all my measurements, including comparisons of the Muses attenuator versus the TKD, assuming there are measurable differences. Let’s talk about this amp’s fabulous sonics. As the builder, I’m proud of my baby and I’ll admit I’m officially biased, but I’ve built a few preamps and amps in my day and some of them have sucked so I’d like to think I’m pretty objective. In a previous episode I waxed rhapsodic over the JDS labs O2 amp, saying that I’d like to pit it against a high priced contender. Well, they warned us in the 1918 song: “How you gonna keep ‘em down on the farm after they’ve seen Paree?” The M³ is haute cuisine — it eats up the O2 for déjeuner, petit déjeuner and dîner! In comparison, the O2 sounds murky, flat (undynamic) and without bass definition. So let’s call the O2 what it is: a middleweight contender, maybe not even a middleweight champ but I don’t know enough middleweights to know for sure. Likewise, the M³ is definitely a heavyweight contender. Maybe after Big Sound 2015 we’ll know if it’s a heavyweight champion.