So with a nod of thanks and admiration for the invaluable restoration information provided by Gary Jacobson—and other Quad ESL experts, such as Ken Kessler (author of Quad: The Closest Approach), Sheldon Stokes, Stewart Penketh, Andrew King, Ron Best of One Thing Audio, Wayne Picquet, Mike Grubb and Randy Stringer of QS&D, my old friend Chris Beeching, and the great Philip O'Hanlon—let's get cracking.
The Visible Quads
An important tip, for safety's sake: There are very high voltages inside any electrostatic loudspeaker, and if you spend your lunch hour poking around inside an ESL that's still plugged in, you'll be having tea with your great-great-great-grandmother before the afternoon is over. That may or may not appeal to you, but it doesn't appeal to the good folks in Primedia's legal department, who want me to remind you that this column is for entertainment purposes only: They are not responsible for the bad things that may happen to people who actually follow my advice. Primedia also wants you to remember that an unplugged ESL continues to hold a lethal charge for up to four hours. I showed this treble panel pic to Gary Jacobson, who said, "I've seen much worse!"
Here's another tip, for practicality's sake: Buy some Ziploc bags for storing all the different screws and assorted little bits, and label them assiduously. Using the serial numbers to guide you, keep the parts for each speaker distinct from one another.
Now then: Start by unscrewing the ESL's three spindly wooden feet from the bottom surface, then get ready to remove the front and rear grillework. Unfasten the curved wooden pieces—lovely things, really—that decorate the sides of the speakers, and you'll uncover a row of staples holding the rough edges of the front grille in place. Pry these out with a screwdriver or pliers, then turn your attention to the bottom edge of the grille and the ten or so screws holding it in place. Remove them, and carefully pull the bottom of the grille toward you until the top portion is also freed: This curves away from you, its edge lodged in a groove behind the half-round molding at the top of the frame.
Unless you're very lucky, you'll see at least one major problem right off the bat: The ravages of arcing. The first speaker I uncovered was the one with the mold and the nonworking treble panel, and the damage was shocking. The treble panel had arced so badly that a hole the size of a nickel was burned into the front and rear stators. Clear through—as in daylight.
I showed this treble panel pic to Gary Jacobson, who said, "I've seen much worse!"
Here's another tip, for practicality's sake: Buy some Ziploc bags for storing all the different screws and assorted little bits, and label them assiduously. Using the serial numbers to guide you, keep the parts for each speaker distinct from one another.
Now then: Start by unscrewing the ESL's three spindly wooden feet from the bottom surface, then get ready to remove the front and rear grillework. Unfasten the curved wooden pieces—lovely things, really—that decorate the sides of the speakers, and you'll uncover a row of staples holding the rough edges of the front grille in place. Pry these out with a screwdriver or pliers, then turn your attention to the bottom edge of the grille and the ten or so screws holding it in place. Remove them, and carefully pull the bottom of the grille toward you until the top portion is also freed: This curves away from you, its edge lodged in a groove behind the half-round molding at the top of the frame.
Unless you're very lucky, you'll see at least one major problem right off the bat: The ravages of arcing. The first speaker I uncovered was the one with the mold and the nonworking treble panel, and the damage was shocking. The treble panel had arced so badly that a hole the size of a nickel was burned into the front and rear stators. Clear through—as in daylight.
 A discarded LP sleeve makes a great splash guard!
For now, simply note the damage and try to do a bit of gentle housecleaning as you go along. A slightly damp rag or a thoroughly wrung-out sponge will help you strip the decades of dust away from the dustcovers, enabling you to assess the damage a little bit better. (Don't be fooled by the dusty color of the woofer panels' front covers: Quad decided to paint them gray when it was discovered that the gleam of raw poly was visible through the grille. The treble panel's dustcover escaped that indignity owing to the fear that the weight of the paint would affect the high-frequency performance—and it probably would.) You'll be replacing all the dustcovers later on: It isn't hard to do, and if they're not torn already, the material is brittle enough by now that it could disintegrate any day.
Move on to the rear grille, which is a different matter altogether. Twenty-one wood screws around the perimeter hold the thing in place, as do two of the four largest bolts on the very bottom, whose main job is holding the transformer in place: The idea is to remove the former but merely loosen the latter. Now, put on some heavy work gloves—the edges of the grille are devilishly sharp—and start prying the bottom edge of the grille away from its moorings. Note that the flat expanse of the grille and the box-like cover around the internals are all one piece. Lift this completely away, then gently pull the three sheets of felt away from the rear of the tweeter panel, noting their position for reassembly: All are stapled in place using two extra strips of wood.
A discarded LP sleeve makes a great splash guard!
For now, simply note the damage and try to do a bit of gentle housecleaning as you go along. A slightly damp rag or a thoroughly wrung-out sponge will help you strip the decades of dust away from the dustcovers, enabling you to assess the damage a little bit better. (Don't be fooled by the dusty color of the woofer panels' front covers: Quad decided to paint them gray when it was discovered that the gleam of raw poly was visible through the grille. The treble panel's dustcover escaped that indignity owing to the fear that the weight of the paint would affect the high-frequency performance—and it probably would.) You'll be replacing all the dustcovers later on: It isn't hard to do, and if they're not torn already, the material is brittle enough by now that it could disintegrate any day.
Move on to the rear grille, which is a different matter altogether. Twenty-one wood screws around the perimeter hold the thing in place, as do two of the four largest bolts on the very bottom, whose main job is holding the transformer in place: The idea is to remove the former but merely loosen the latter. Now, put on some heavy work gloves—the edges of the grille are devilishly sharp—and start prying the bottom edge of the grille away from its moorings. Note that the flat expanse of the grille and the box-like cover around the internals are all one piece. Lift this completely away, then gently pull the three sheets of felt away from the rear of the tweeter panel, noting their position for reassembly: All are stapled in place using two extra strips of wood.
 Twisting the paint scraper slowly, slowly in the gap.
Next, heat up your soldering iron in anticipation of disconnecting the three electrostatic panels from the HT unit and the audio transformer. Start with the bass panel on the right (as viewed from the rear), and wedge a piece of cardboard between the terminal strip at the bottom of the panel and the panel itself, to protect the works from splashing molten solder. Use some desoldering braid to wick away the excess—you'll be glad you did later on—and as you disconnect each wire, band it with a piece of masking tape and label its source and destination as clearly as you can.
Now, turning your attention to the other side, loosen and remove all four transformer bolts from underneath the frame while holding the trannie at least somewhat still, so it doesn't bash into the panel. (This is tricky but doable. Thankfully, the housing itself is threaded, so you won't have to worry about holding your nuts.) There should be enough slack in the wires exiting the transformer that you can at least flip it out of the way, giving access to the other panel's terminal strip. Protect and disconnect, as above.
You're almost done with the soldering iron. Label the wires leading to the transformer and desolder all of them from the square terminal board except the pair of wires, one black and one white, leading to the nearest bass panel. Turn your attention to the HT unit, and desolder the thin (center) red wire, which goes to the treble panel. Unbolt the HT unit from the frame, and remove it and the transformer housing altogether. Label them.
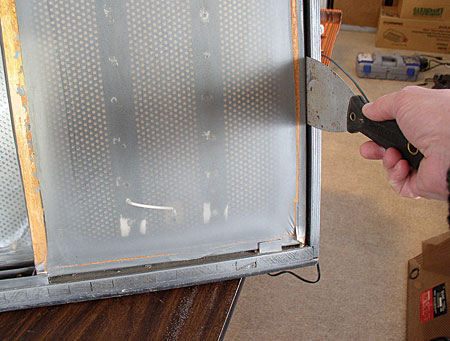
Working from the front of the speaker now, remove the two central brackets—one up, one down—that hold the treble panel in place, and then the smaller upper and lower brackets that hold the bass panels on each side. In theory, the bass panels can now be removed—but they'll almost certainly need some coaxing. Do that by inserting a paint scraper between a given panel and the inside edge of the enclosure frame, and twisting it gently.
With the bass panels out of the way you can now remove the treble panel as well—but watch out for the locator spikes! These are small, sharp, nail-point sorts of things that protrude from the two curved wooden struts that support the treble panel from the rear, and their job is to hold the panel securely. If you don't know they're there, you could snag the dustcover on one of them: Not a problem during disassembly, but a big problem when the new panels go back in.
Twisting the paint scraper slowly, slowly in the gap.
Next, heat up your soldering iron in anticipation of disconnecting the three electrostatic panels from the HT unit and the audio transformer. Start with the bass panel on the right (as viewed from the rear), and wedge a piece of cardboard between the terminal strip at the bottom of the panel and the panel itself, to protect the works from splashing molten solder. Use some desoldering braid to wick away the excess—you'll be glad you did later on—and as you disconnect each wire, band it with a piece of masking tape and label its source and destination as clearly as you can.
Now, turning your attention to the other side, loosen and remove all four transformer bolts from underneath the frame while holding the trannie at least somewhat still, so it doesn't bash into the panel. (This is tricky but doable. Thankfully, the housing itself is threaded, so you won't have to worry about holding your nuts.) There should be enough slack in the wires exiting the transformer that you can at least flip it out of the way, giving access to the other panel's terminal strip. Protect and disconnect, as above.
You're almost done with the soldering iron. Label the wires leading to the transformer and desolder all of them from the square terminal board except the pair of wires, one black and one white, leading to the nearest bass panel. Turn your attention to the HT unit, and desolder the thin (center) red wire, which goes to the treble panel. Unbolt the HT unit from the frame, and remove it and the transformer housing altogether. Label them.
Working from the front of the speaker now, remove the two central brackets—one up, one down—that hold the treble panel in place, and then the smaller upper and lower brackets that hold the bass panels on each side. In theory, the bass panels can now be removed—but they'll almost certainly need some coaxing. Do that by inserting a paint scraper between a given panel and the inside edge of the enclosure frame, and twisting it gently.
With the bass panels out of the way you can now remove the treble panel as well—but watch out for the locator spikes! These are small, sharp, nail-point sorts of things that protrude from the two curved wooden struts that support the treble panel from the rear, and their job is to hold the panel securely. If you don't know they're there, you could snag the dustcover on one of them: Not a problem during disassembly, but a big problem when the new panels go back in.
 An empty frame, ready for sanding and painting.
Finally, use that paint scraper to remove the bits of dried-up weather stripping that remain on the frame, and clean and inspect the enclosure. It's up to you whether it needs sanding and repainting or just a good scrubbing; I opted for the former. I also decided to refurbish the wooden side panels on my pair, so I started by removing their finish with a paste-type stripper, then sanded with 150-, 280-, and 400-grit sandpaper. Regardless of your decorating plans, before you put the ESL back together again, locate and tighten all the screws that hold the frame together.
Quad is in the details
An empty frame, ready for sanding and painting.
Finally, use that paint scraper to remove the bits of dried-up weather stripping that remain on the frame, and clean and inspect the enclosure. It's up to you whether it needs sanding and repainting or just a good scrubbing; I opted for the former. I also decided to refurbish the wooden side panels on my pair, so I started by removing their finish with a paste-type stripper, then sanded with 150-, 280-, and 400-grit sandpaper. Regardless of your decorating plans, before you put the ESL back together again, locate and tighten all the screws that hold the frame together.
Quad is in the details
Time to take stock: You should have two bass panels, one treble panel, one HT unit, one transformer, one front grille, one rear grille, two side pieces, three feet, and several Ziploc bags filled with assorted parts. Actually, you should have all of that times two. How bad does everything look? You can buy newly made side pieces and newly made feet—though the latter tend to be expensive, for some unquadly reason. The ESL's transformers seldom fail, but the values of the eight resistors and three (footnote 1) capacitors in the crossover network may have drifted by now—and besides, there are modern substitutes that offer potentially better sound: Let's earmark those for replacement. Even if the wiring looks good, keep in mind that it must withstand very high voltages—and that technology, too, has progressed over the years. I say replace it.
The HT unit? Play it safe and assume the worst: Replace the rectifier block. (The mains trannie should still be okay.)
You already know how I feel about the dustcovers—replace them all—but take a close look at the stators and diaphragms within. Depending on your ESLs' age, you'll probably find a few spots of carbon on the treble panels; if so, you should opt for fresh ones. Have them rebuilt if the stators are in good physical shape, or buy a newly rebuilt pair from one of the experts. Even if a treble panel seems to work, it may not be working optimally—and it's almost certainly less sensitive than it was when new.
Bass panels are another matter: Arcing is much less common with them, because their stators are spaced a great deal farther apart than those of the treble panels. On the other hand, owing to the fact that the conductive Calaton coating can shed over time, which can hinder the diaphragm's ability to maintain a constant charge, you may want to have the bass panels rebuilt as well. (Those stators tend not to suffer irreversible damage—although you want to look closely at the rivet areas in particular, for evidence of arcing there.)
I decided to buy a fresh pair of treble panels for my own ESLs—as you can tell from the photos, the stators were too far gone to rebuild—and a fresh pair of rectifier blocks for the HT units, too. Those items are available from a number of sources in North America and the UK; I chose Wayne Picquet of Quads Unlimited in Longwood, Florida, whose panel rebuilds in particular are at the very top of many people's lists. Wayne also supplied me with enough dustcover material to redo all four of my bass panels. And Philip O'Hanlon offered some spares of the high-voltage hookup wire and the crossover resistors and capacitors he'd bought for his own ESL project.
I decided to buy one more thing: a pair of Wayne Picquet's protection circuits, designed to limit the amount of voltage that can reach the treble panels, thus minimizing, if not eliminating, future diaphragm and stator burnouts. Not everyone in the ESL community agrees that protection circuits are a good idea, but I figured I could always get rid of them if they foreshorten my soundstage or some such thing.
All right, then: The paint is drying on the frames. The shellac is drying on the side pieces. The mold is drying on the grillework. And the glue is drying on the new treble panels. Tomorrow I'll put them back together, fire up the amps (just a figure of speech, I hope), and play a few records. Keep an eye on eBay now that you know what to look for, and next month we'll pick up where we left off.
Footnote 1: Very early samples, such as mine, had only one cap, but the crossover frequencies were changed after a while.
An important tip, for safety's sake: There are very high voltages inside any electrostatic loudspeaker, and if you spend your lunch hour poking around inside an ESL that's still plugged in, you'll be having tea with your great-great-great-grandmother before the afternoon is over. That may or may not appeal to you, but it doesn't appeal to the good folks in Primedia's legal department, who want me to remind you that this column is for entertainment purposes only: They are not responsible for the bad things that may happen to people who actually follow my advice. Primedia also wants you to remember that an unplugged ESL continues to hold a lethal charge for up to four hours.
I showed this treble panel pic to Gary Jacobson, who said, "I've seen much worse!"
Here's another tip, for practicality's sake: Buy some Ziploc bags for storing all the different screws and assorted little bits, and label them assiduously. Using the serial numbers to guide you, keep the parts for each speaker distinct from one another.
A discarded LP sleeve makes a great splash guard!
For now, simply note the damage and try to do a bit of gentle housecleaning as you go along. A slightly damp rag or a thoroughly wrung-out sponge will help you strip the decades of dust away from the dustcovers, enabling you to assess the damage a little bit better. (Don't be fooled by the dusty color of the woofer panels' front covers: Quad decided to paint them gray when it was discovered that the gleam of raw poly was visible through the grille. The treble panel's dustcover escaped that indignity owing to the fear that the weight of the paint would affect the high-frequency performance—and it probably would.) You'll be replacing all the dustcovers later on: It isn't hard to do, and if they're not torn already, the material is brittle enough by now that it could disintegrate any day.
Twisting the paint scraper slowly, slowly in the gap.
Next, heat up your soldering iron in anticipation of disconnecting the three electrostatic panels from the HT unit and the audio transformer. Start with the bass panel on the right (as viewed from the rear), and wedge a piece of cardboard between the terminal strip at the bottom of the panel and the panel itself, to protect the works from splashing molten solder. Use some desoldering braid to wick away the excess—you'll be glad you did later on—and as you disconnect each wire, band it with a piece of masking tape and label its source and destination as clearly as you can.
Now, turning your attention to the other side, loosen and remove all four transformer bolts from underneath the frame while holding the trannie at least somewhat still, so it doesn't bash into the panel. (This is tricky but doable. Thankfully, the housing itself is threaded, so you won't have to worry about holding your nuts.) There should be enough slack in the wires exiting the transformer that you can at least flip it out of the way, giving access to the other panel's terminal strip. Protect and disconnect, as above.
An empty frame, ready for sanding and painting.
Finally, use that paint scraper to remove the bits of dried-up weather stripping that remain on the frame, and clean and inspect the enclosure. It's up to you whether it needs sanding and repainting or just a good scrubbing; I opted for the former. I also decided to refurbish the wooden side panels on my pair, so I started by removing their finish with a paste-type stripper, then sanded with 150-, 280-, and 400-grit sandpaper. Regardless of your decorating plans, before you put the ESL back together again, locate and tighten all the screws that hold the frame together.
Quad is in the details
Time to take stock: You should have two bass panels, one treble panel, one HT unit, one transformer, one front grille, one rear grille, two side pieces, three feet, and several Ziploc bags filled with assorted parts. Actually, you should have all of that times two. How bad does everything look? You can buy newly made side pieces and newly made feet—though the latter tend to be expensive, for some unquadly reason. The ESL's transformers seldom fail, but the values of the eight resistors and three (footnote 1) capacitors in the crossover network may have drifted by now—and besides, there are modern substitutes that offer potentially better sound: Let's earmark those for replacement. Even if the wiring looks good, keep in mind that it must withstand very high voltages—and that technology, too, has progressed over the years. I say replace it.
Footnote 1: Very early samples, such as mine, had only one cap, but the crossover frequencies were changed after a while.