Remember that if your tonearm has an offset headshell, VTA/SRA and azimuth adjustment will be interrelated so that adjusting one affects the other. I believe that often, when people claim to hear a big sonic difference when they make minute VTA/SRA changes, they're instead hearing the effects of an azimuth change. The relationship is well spelled out in the WallyReference manual. WallyTools supplies the tools necessary for adjusting various arm configurations, whether azimuth adjustment is carried out at the headshell or on the armtube.
Set SRA using a USB microscope
Setting SRA to 92.5° (which more often than not produces 92° under dynamic, spinning-disc conditions) is best done with a microscope. I use a now-discontinued Dino-Lite 330 mounted on a gooseneck stand, with the supplied software. I've learned how to get the most out of it, despite its shortcomings.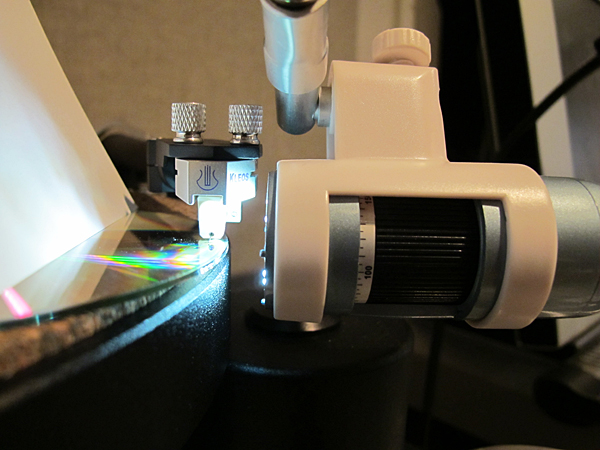 I haven't got enough space to go into detail here, but you'll find details in profusion in the video on the WallyTools website. If you want details, lots can be found by clicking on the "At Home SRA Analysis Instructions" button at the bottom right of the page. I recommend you also watch the Webinar Video (button bottom left). Getting accurate measurements requires you to follow certain guidelines, which are spelled out in the video. This procedure has a fairly steep learning curve, but it's well worth the effort. Avoid anxiety by using an inexpensive cartridge your first time.
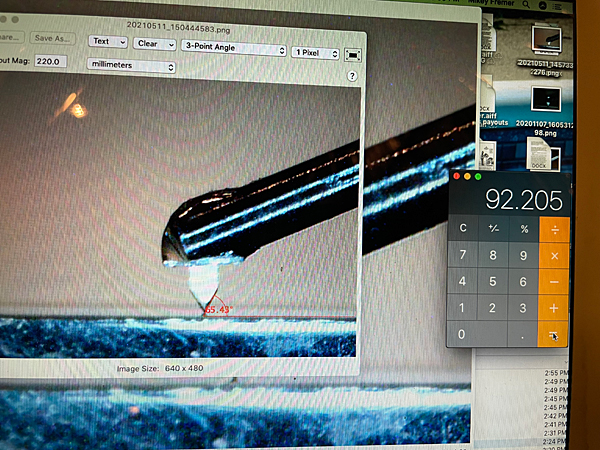 I've seen close-up "macro" digital photos taken by readers that when "blown up" were of sufficient resolution and accuracy that, when used with a plastic protractor placed against the screen, could determine whether a cartridge has been incorrectly manufactured so that 92° would be impossible to achieve. That methodology can often get you in range of proper SRA, though the microscope approach is better. This is critically important information, especially if you've invested five figures in a cartridge.
With SRA set to 92.5°, I recheck VTF and then, with antiskating off, use the new WallySkater (a seriously upgraded version of the one I used in Copenhagen) to be sure the arm is not applying horizontal (antiskating) force (see cantilever skew story above).
I've seen close-up "macro" digital photos taken by readers that when "blown up" were of sufficient resolution and accuracy that, when used with a plastic protractor placed against the screen, could determine whether a cartridge has been incorrectly manufactured so that 92° would be impossible to achieve. That methodology can often get you in range of proper SRA, though the microscope approach is better. This is critically important information, especially if you've invested five figures in a cartridge.
With SRA set to 92.5°, I recheck VTF and then, with antiskating off, use the new WallySkater (a seriously upgraded version of the one I used in Copenhagen) to be sure the arm is not applying horizontal (antiskating) force (see cantilever skew story above).
 Then I use the WallyTractor Universal protractor to set overhang and zenith angle using Löfgren A alignment (for the SAT arm I use its similar, arc-type gauge). I find it reassuring to see the stylus riding in the arc's groove across the entire surface of the tool rather than sitting correctly in either a single "null" point or even in both null points. The WallyTractor has a second set of arcs, which is useful if your collection includes many recently produced records that aren't cut almost to the label. WAM Engineering claims that when used for a newer record collection, these arcs can reduce linear tracking error by 25% and produce distortion measurements typical of a 12" arm from a 9" arm—not that I think 9" arm distortion is an issue.
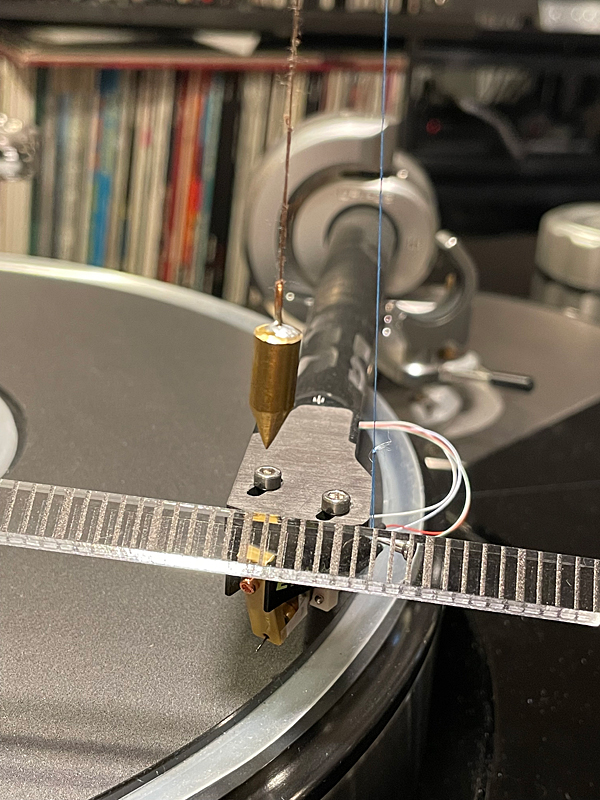 I now check VTF again then use the new, improved WallySkater to set antiskating. To learn more about With antiskating "off," the plumb bob and finger lift should align. When the added antiskating force moves the arm toward the platter's outer edge and produces between 10 and 12 deviations on the scale, "antiskating has been set correctly. (There's a secondary check that I won't go into here.)
Finally, I set azimuth using a digital oscilloscope and the Analogue Productions Ultimate Analogue Test LP. The second and third bands on Side 1 provide left-channel-only and right-channel-only 1kHz-modulated grooves. Theoretically, the unmodulated groove should produce 0 volts, but there's always crosstalk.
To do this correctly, it's best to use a solid state phono preamp with dependably identical output for each channel. The phono preamp output must be connected to the oscilloscope probes. There are various ways of doing that including something as simple as wiring up a pair of chassis mount RCA jacks with bare loops on the unsoldered end, to building an interface box or having one built for you as I did.
I now check VTF again then use the new, improved WallySkater to set antiskating. To learn more about With antiskating "off," the plumb bob and finger lift should align. When the added antiskating force moves the arm toward the platter's outer edge and produces between 10 and 12 deviations on the scale, "antiskating has been set correctly. (There's a secondary check that I won't go into here.)
Finally, I set azimuth using a digital oscilloscope and the Analogue Productions Ultimate Analogue Test LP. The second and third bands on Side 1 provide left-channel-only and right-channel-only 1kHz-modulated grooves. Theoretically, the unmodulated groove should produce 0 volts, but there's always crosstalk.
To do this correctly, it's best to use a solid state phono preamp with dependably identical output for each channel. The phono preamp output must be connected to the oscilloscope probes. There are various ways of doing that including something as simple as wiring up a pair of chassis mount RCA jacks with bare loops on the unsoldered end, to building an interface box or having one built for you as I did.
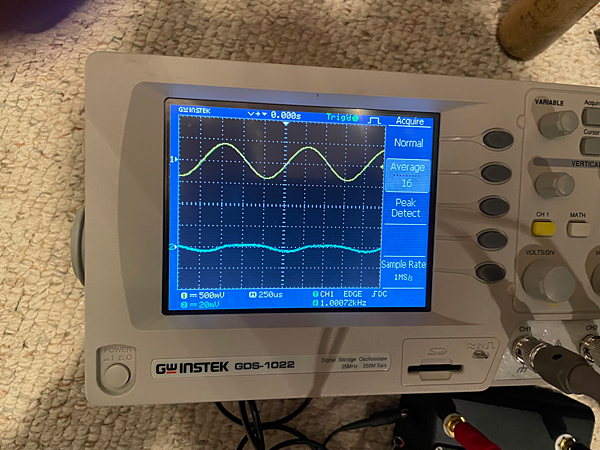 The digital oscilloscope takes voltage readings 16 times a second and produces a reliable average. My Instek GDS-1022 cost around $400, but it was discontinued and replaced with the far more compact GDS-207, which costs $700; you can find other, similar 'scopes online for around $350. The specific measurement procedure varies among oscilloscopes, but the goal is to adjust the azimuth so that the crosstalk is minimized and equal in both directions, L–R and R–L.
You can also use a high-quality dual-channel voltmeter, preferably with a large analog meter like the Leader LMV-89 that Soundsmith's Peter Ledermann recommended to me. You'll get more accurate channel-separation measurements using the voltmeter, but for the purposes of setting azimuth (as opposed to assessing a cartridge's actual channel-separation specs), the digital oscilloscope is just as good.
If you go the dual-channel voltmeter route, you'll need to insert two "short filter cable interrupts" (as Ledermann called them) that filter from 30Hz down (–3dB at 30Hz, –6dB at 15Hz, –12dB at 8 Hz) to get rid of some of the rumble.
I take five readings, starting with the headshell tilted approximately 2° to the left and ending with it tilted 2° to the right. Each measurement produces a large voltage from the modulated channel and a small voltage from the unmodulated channel. After converting the voltage to dBV (decibel-volts) and subtracting the smaller voltage from the larger one, you get two sets of crosstalk figures, one L–R and one R–L.
One of the five sets of measurements will produce maximum separation and minimum crosstalk. That might be the correct final azimuth setting, but unless the two sets of measurements are identical (ie, 28dB L–R and 28dB R–L), which doesn't often happen, it's best to take at least two more readings, one on either side of the best of the first five measurements, shifting azimuth slightly in either direction, and then settling on the best one.
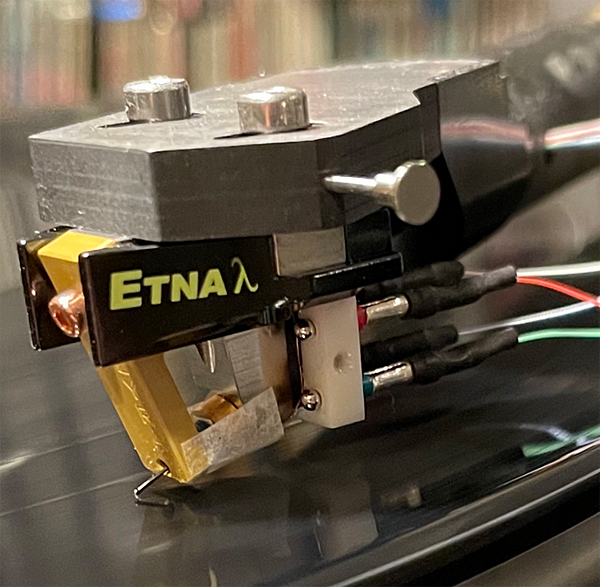
How do you know when it's good enough? A 2dB difference between the L–R and R–L measurements is considered more than sufficient, although occasionally you can get an identical measurement in both directions. And sometimes that can be achieved when the headshell is in its parallel-to-the–record-surface position, though that almost never happens (it happened once to me with the original Lyra Etna SL), which is why setting azimuth by setting the cantilever perpendicular to the record surface isn't good enough.
Zenith
The digital oscilloscope takes voltage readings 16 times a second and produces a reliable average. My Instek GDS-1022 cost around $400, but it was discontinued and replaced with the far more compact GDS-207, which costs $700; you can find other, similar 'scopes online for around $350. The specific measurement procedure varies among oscilloscopes, but the goal is to adjust the azimuth so that the crosstalk is minimized and equal in both directions, L–R and R–L.
You can also use a high-quality dual-channel voltmeter, preferably with a large analog meter like the Leader LMV-89 that Soundsmith's Peter Ledermann recommended to me. You'll get more accurate channel-separation measurements using the voltmeter, but for the purposes of setting azimuth (as opposed to assessing a cartridge's actual channel-separation specs), the digital oscilloscope is just as good.
If you go the dual-channel voltmeter route, you'll need to insert two "short filter cable interrupts" (as Ledermann called them) that filter from 30Hz down (–3dB at 30Hz, –6dB at 15Hz, –12dB at 8 Hz) to get rid of some of the rumble.
I take five readings, starting with the headshell tilted approximately 2° to the left and ending with it tilted 2° to the right. Each measurement produces a large voltage from the modulated channel and a small voltage from the unmodulated channel. After converting the voltage to dBV (decibel-volts) and subtracting the smaller voltage from the larger one, you get two sets of crosstalk figures, one L–R and one R–L.
One of the five sets of measurements will produce maximum separation and minimum crosstalk. That might be the correct final azimuth setting, but unless the two sets of measurements are identical (ie, 28dB L–R and 28dB R–L), which doesn't often happen, it's best to take at least two more readings, one on either side of the best of the first five measurements, shifting azimuth slightly in either direction, and then settling on the best one.
How do you know when it's good enough? A 2dB difference between the L–R and R–L measurements is considered more than sufficient, although occasionally you can get an identical measurement in both directions. And sometimes that can be achieved when the headshell is in its parallel-to-the–record-surface position, though that almost never happens (it happened once to me with the original Lyra Etna SL), which is why setting azimuth by setting the cantilever perpendicular to the record surface isn't good enough.
Zenith
Not long ago, I sent a phono cartridge to J.R. Boisclair for inspection. He discovered a zenith angle error—that's the alignment of the stylus's contact edges, which we cannot see, relative to the cantilever, which we use to align for proper offset angle—of more than 2°. He compensated for the zenith-angle error and heard an easily audible improvement. He told me he produced a blind test using volunteers, who corroborated what he heard.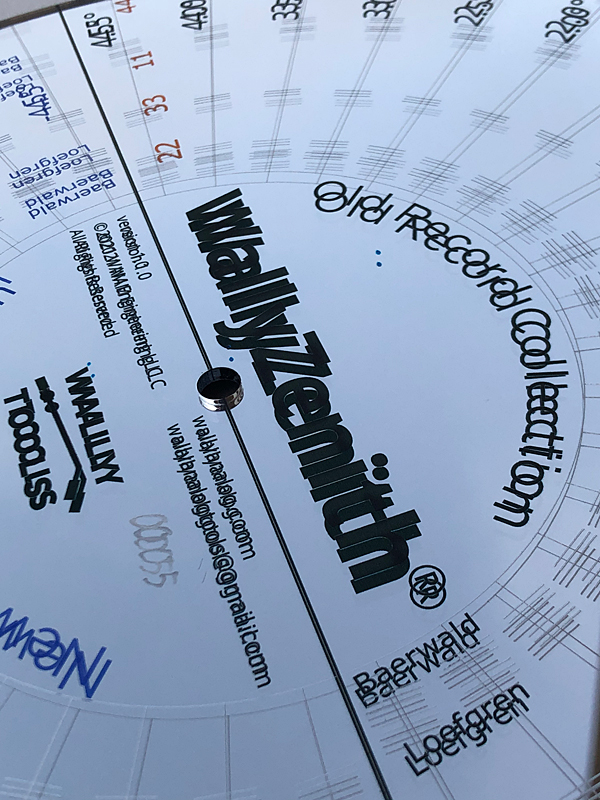 Boisclair returned that cartridge to me along with a new tool, the WallyZenith, which features zenith-angle hashmarks etched at various deviations from perpendicularity to the cantilever. It's only useful if you've had your cartridge examined. (Boisclair says he's not quite ready for "assembly line" zenith-angle stylus inspection.)
All this may seem extreme, but it takes less time to go through this process than you might think, and it's worth any reasonable amount of trouble to eliminate guesswork.
Boisclair returned that cartridge to me along with a new tool, the WallyZenith, which features zenith-angle hashmarks etched at various deviations from perpendicularity to the cantilever. It's only useful if you've had your cartridge examined. (Boisclair says he's not quite ready for "assembly line" zenith-angle stylus inspection.)
All this may seem extreme, but it takes less time to go through this process than you might think, and it's worth any reasonable amount of trouble to eliminate guesswork.
 When you're done, unless you slipped up, there will be no surprises. The first thing people say when they hear a cartridge that's correctly set up is either that finally they don't hear mechanical artifacts or that their turntable has never sounded so spatially and timbrally well-balanced.
For Rega Arm Users
When you're done, unless you slipped up, there will be no surprises. The first thing people say when they hear a cartridge that's correctly set up is either that finally they don't hear mechanical artifacts or that their turntable has never sounded so spatially and timbrally well-balanced.
For Rega Arm Users
BTW: Rega's three-point cartridge mount produces a Stevenson-type alignment, which I consider measurably and sonically the worst because while it minimizes distortion at the end of the side, it produces far greater distortion than Löfgren A over almost the entire rest of the record. Rega owners should try Löfgren A. If you don't like it, it's easy enough to screw in all three screws and return to the factory setting. Rega Research values rigidity over adjustability and considers setup parameters other than VTF, overhang, and antiskating unimportant. Their case for rigidity is strong; I'll even admit that less adjustability is better than a complete but sloppy adjustability. I've also heard a good "best mechanical performance" case made for having the stylus sitting perfectly centered in the groove even if it results in an electrical imbalance, rather than setting azimuth electronically, but in my experience, on a well-designed and -constructed arm, setting all parameters as described here delivers the best performance.
WallyTools offers the WallyFulcrum, an azimuth adjustment tool for Rega arms made of a highly rigid material offering a "solid union between cartridge and tonearm" that changes azimuth angle in increments as small as 0.25°. When you adjust azimuth at the headshell, SRA is not affected.
One final Rega-related setup tip: While Rega arms do not offer VTA/SRA adjustability, Acoustic Signature manufactures easy-to-use three-point SRA-raising shims that require only that you loosen the three arm mounting screws (footnote 1). You don't have to remove the arm (though if you need all of the shims, the hinged cover supplied with the less-costly Regas won't close). To lower SRA, try a thicker mat, like Funk Firm's 3.5mm or 5mm Achromat platter mat: Raising the front of the arm has the same effect as lowering the rear, but you already knew that. The Achromat sounds much better than the supplied felt dust attractor.
Footnote 1: Note, however, that Rega strongly discourages the use of aftermarket shims with its top turntable, the Planar 10, because its light-and-rigid plinth material can crack.—Editor
Setting SRA to 92.5° (which more often than not produces 92° under dynamic, spinning-disc conditions) is best done with a microscope. I use a now-discontinued Dino-Lite 330 mounted on a gooseneck stand, with the supplied software. I've learned how to get the most out of it, despite its shortcomings.
I haven't got enough space to go into detail here, but you'll find details in profusion in the video on the WallyTools website. If you want details, lots can be found by clicking on the "At Home SRA Analysis Instructions" button at the bottom right of the page. I recommend you also watch the Webinar Video (button bottom left). Getting accurate measurements requires you to follow certain guidelines, which are spelled out in the video. This procedure has a fairly steep learning curve, but it's well worth the effort. Avoid anxiety by using an inexpensive cartridge your first time.
I've seen close-up "macro" digital photos taken by readers that when "blown up" were of sufficient resolution and accuracy that, when used with a plastic protractor placed against the screen, could determine whether a cartridge has been incorrectly manufactured so that 92° would be impossible to achieve. That methodology can often get you in range of proper SRA, though the microscope approach is better. This is critically important information, especially if you've invested five figures in a cartridge.
With SRA set to 92.5°, I recheck VTF and then, with antiskating off, use the new WallySkater (a seriously upgraded version of the one I used in Copenhagen) to be sure the arm is not applying horizontal (antiskating) force (see cantilever skew story above).
Then I use the WallyTractor Universal protractor to set overhang and zenith angle using Löfgren A alignment (for the SAT arm I use its similar, arc-type gauge). I find it reassuring to see the stylus riding in the arc's groove across the entire surface of the tool rather than sitting correctly in either a single "null" point or even in both null points. The WallyTractor has a second set of arcs, which is useful if your collection includes many recently produced records that aren't cut almost to the label. WAM Engineering claims that when used for a newer record collection, these arcs can reduce linear tracking error by 25% and produce distortion measurements typical of a 12" arm from a 9" arm—not that I think 9" arm distortion is an issue.
I now check VTF again then use the new, improved WallySkater to set antiskating. To learn more about With antiskating "off," the plumb bob and finger lift should align. When the added antiskating force moves the arm toward the platter's outer edge and produces between 10 and 12 deviations on the scale, "antiskating has been set correctly. (There's a secondary check that I won't go into here.)
Finally, I set azimuth using a digital oscilloscope and the Analogue Productions Ultimate Analogue Test LP. The second and third bands on Side 1 provide left-channel-only and right-channel-only 1kHz-modulated grooves. Theoretically, the unmodulated groove should produce 0 volts, but there's always crosstalk.
To do this correctly, it's best to use a solid state phono preamp with dependably identical output for each channel. The phono preamp output must be connected to the oscilloscope probes. There are various ways of doing that including something as simple as wiring up a pair of chassis mount RCA jacks with bare loops on the unsoldered end, to building an interface box or having one built for you as I did.
The digital oscilloscope takes voltage readings 16 times a second and produces a reliable average. My Instek GDS-1022 cost around $400, but it was discontinued and replaced with the far more compact GDS-207, which costs $700; you can find other, similar 'scopes online for around $350. The specific measurement procedure varies among oscilloscopes, but the goal is to adjust the azimuth so that the crosstalk is minimized and equal in both directions, L–R and R–L.
You can also use a high-quality dual-channel voltmeter, preferably with a large analog meter like the Leader LMV-89 that Soundsmith's Peter Ledermann recommended to me. You'll get more accurate channel-separation measurements using the voltmeter, but for the purposes of setting azimuth (as opposed to assessing a cartridge's actual channel-separation specs), the digital oscilloscope is just as good.
If you go the dual-channel voltmeter route, you'll need to insert two "short filter cable interrupts" (as Ledermann called them) that filter from 30Hz down (–3dB at 30Hz, –6dB at 15Hz, –12dB at 8 Hz) to get rid of some of the rumble.
Not long ago, I sent a phono cartridge to J.R. Boisclair for inspection. He discovered a zenith angle error—that's the alignment of the stylus's contact edges, which we cannot see, relative to the cantilever, which we use to align for proper offset angle—of more than 2°. He compensated for the zenith-angle error and heard an easily audible improvement. He told me he produced a blind test using volunteers, who corroborated what he heard.
Boisclair returned that cartridge to me along with a new tool, the WallyZenith, which features zenith-angle hashmarks etched at various deviations from perpendicularity to the cantilever. It's only useful if you've had your cartridge examined. (Boisclair says he's not quite ready for "assembly line" zenith-angle stylus inspection.)
All this may seem extreme, but it takes less time to go through this process than you might think, and it's worth any reasonable amount of trouble to eliminate guesswork.
When you're done, unless you slipped up, there will be no surprises. The first thing people say when they hear a cartridge that's correctly set up is either that finally they don't hear mechanical artifacts or that their turntable has never sounded so spatially and timbrally well-balanced.
For Rega Arm UsersBTW: Rega's three-point cartridge mount produces a Stevenson-type alignment, which I consider measurably and sonically the worst because while it minimizes distortion at the end of the side, it produces far greater distortion than Löfgren A over almost the entire rest of the record. Rega owners should try Löfgren A. If you don't like it, it's easy enough to screw in all three screws and return to the factory setting. Rega Research values rigidity over adjustability and considers setup parameters other than VTF, overhang, and antiskating unimportant. Their case for rigidity is strong; I'll even admit that less adjustability is better than a complete but sloppy adjustability. I've also heard a good "best mechanical performance" case made for having the stylus sitting perfectly centered in the groove even if it results in an electrical imbalance, rather than setting azimuth electronically, but in my experience, on a well-designed and -constructed arm, setting all parameters as described here delivers the best performance.
Footnote 1: Note, however, that Rega strongly discourages the use of aftermarket shims with its top turntable, the Planar 10, because its light-and-rigid plinth material can crack.—Editor