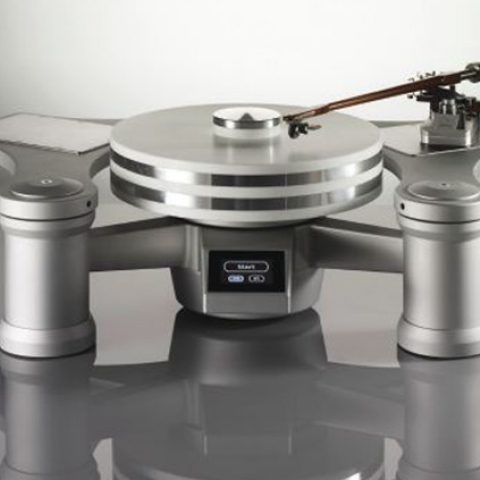
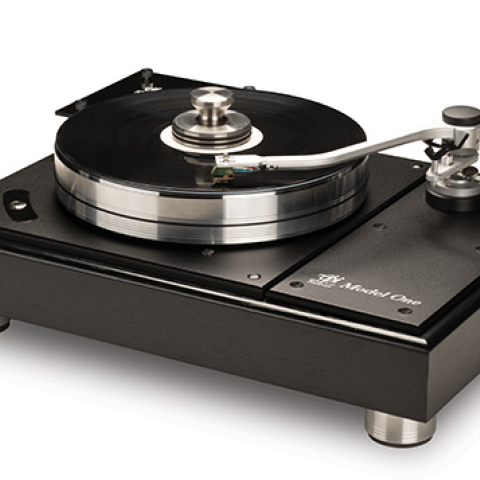
Turntables are intrinsically cool. Maybe it's that I am of the pre-CD generation, for which the acquisition of one's first really good turntable marked an audiophile's coming of age. Just as turntable technology has progressed to such awe-inspiring pieces as the SME 30/2 and Rockport Technologies Sirius III, less stratospherically priced 'tables now offer levels of performance that, if not revelatory, show why so many audiophiles (including yours truly) continue to love their LPs with something just short of fanaticism.  Clearaudio's Champion 2 turntable is about as good-looking a piece of audio gear as there is. The Champ 2's suspensionless plinth is a two-level affair, the two hefty, polished acrylic slabs separated by stainless-steel pucks. These, according to Clearaudio, not only add mass (including its motor and motor stand, the Champ 2 weighs 72 lbs), but also help to control resonances. Under the lower acrylic slab are three spiked feet that fit into supplied discs, preventing the spikes from marring whatever the 'table is set on. The thick acrylic platter is a dead ringer for that used on Clearaudio's much more expensive Maximum Solution and Reference series turntables, and is commendably inert when tapped—as is pretty much every other part of the Champ 2. As is seen ever more often, the Champ 2's motor is not mounted to its plinth. Instead, the stainless-steel-cased motor sits on a stainless-steel stand that precisely matches the diameter of the motor housing; this gets the motor up to the appropriate level for driving the platter. Squarish notches in the rear left corners of the plinth's layers provide space for the motor, which can be rotated atop its stand to alter the tension of the thin, round-profile drive belt. Also included is the Clever Clamp, a spiffy little disc that is popped over the spindle to secure the LP to the platter and flatten out minor warps. Everything is beautifully made and finished, and the total effect is striking and extremely handsome; the Champion 2 looks and feels as if it costs a lot more than $2800.
Setup
Clearaudio's Champion 2 turntable is about as good-looking a piece of audio gear as there is. The Champ 2's suspensionless plinth is a two-level affair, the two hefty, polished acrylic slabs separated by stainless-steel pucks. These, according to Clearaudio, not only add mass (including its motor and motor stand, the Champ 2 weighs 72 lbs), but also help to control resonances. Under the lower acrylic slab are three spiked feet that fit into supplied discs, preventing the spikes from marring whatever the 'table is set on. The thick acrylic platter is a dead ringer for that used on Clearaudio's much more expensive Maximum Solution and Reference series turntables, and is commendably inert when tapped—as is pretty much every other part of the Champ 2. As is seen ever more often, the Champ 2's motor is not mounted to its plinth. Instead, the stainless-steel-cased motor sits on a stainless-steel stand that precisely matches the diameter of the motor housing; this gets the motor up to the appropriate level for driving the platter. Squarish notches in the rear left corners of the plinth's layers provide space for the motor, which can be rotated atop its stand to alter the tension of the thin, round-profile drive belt. Also included is the Clever Clamp, a spiffy little disc that is popped over the spindle to secure the LP to the platter and flatten out minor warps. Everything is beautifully made and finished, and the total effect is striking and extremely handsome; the Champion 2 looks and feels as if it costs a lot more than $2800.
Setup
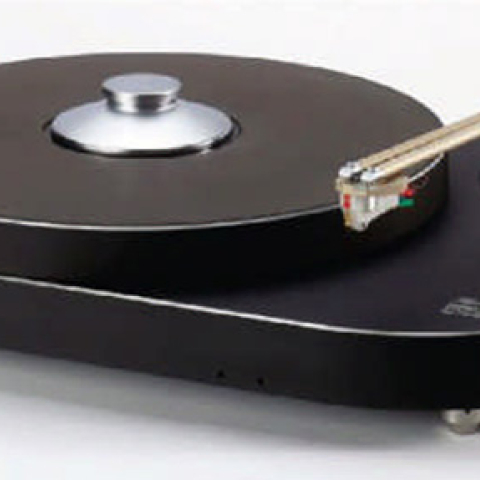
The Champion 2's tonearm mounting system is unlike any other I've seen, and not easy to describe or deal with. At the rear right corners of the plinth's two layers are identically sized cutouts. To mount the armboard, one must first place one acrylic collar into the cutout on the top of the upper plinth, then, reaching upside-down between the two plinth layers, hold a second collar against the bottom of the upper plinth's cutout. Next, a machine screw must be threaded through the unthreaded holes in the two collars and a spacing sleeve slipped over said machine screw. At this point, you must try to secure the machine screw into the threaded holes on the bottom of the actual arm-mounting board, which eventually sits atop the aforementioned spacers. Trying to get the short leg of the supplied Allen key between the two plinth layers while simultaneously holding on to the machine screw, bottom collar, and armboard is a task for an octopus. Lots of loose bits have to be assembled from an awkward, upside-down position in a tight space, working against gravity all the way. In short, assembling the Champion 2 was incredibly, infuriatingly difficult. It became somewhat simpler after I'd secured the first two screws to the armboard, as I now needed only two hands instead of three. Still, the first time I attempted it, it took me more than two hours to finally secure all six screws. And the arm still was not installed—just the armboard. After this miserable experience, I threw in the towel and called in the Analog Guru himself, Wally Malewicz of WallyTools fame. A fellow Twin Cities resident, Wally handled all arm installations and cartridge setups on the Champ 2 from there on out (footnote 1).
Geometric adjustment is provided by turning the collar-spacer-armboard assembly. Unfortunately, the collar, screw, spacer, and armboard must be left a bit loose to facilitate making this adjustment; making sure everything stays precisely in place while trying to squeeze my hand and the Allen key between the plinths was another exercise in frustration. Last, if you've chosen the wrong orientation of the arm on the unmarked, eccentrically cut armboard, and the arm's geometry will not correctly line up, the arm must be completely dismounted and you get to start over (footnote 2). Still, after all the monkey-motion and frustration are over with, the armboard assembly is, like the rest of the Champion 2, very solid and sturdy. But why put a user through so much vexatious effort in the first place?
Footnote 1: With me assisting—mainly by holding the armboard and spacing sleeves while he struggled to insert the screws and get them to grab the armboard—Wally had an easier time of it than I had, but it took him the better part of an hour to get everything assembled and set up. Bringing in an outside expert should not be necessary to successfully set up a medium-priced turntable. Perhaps the revised owner's manual includes some tips for assembly that my early-draft version did not.
Footnote 3: Considerably more exotic 'tables can be models of simplicity to set up. My reference SOTA Cosmos Series III, for one: Unpack it, release the screws that secure the bearing, set it on a level stand, and mount the armboard with three easily accessible screws. Hook up power and vacuum lines and voil;ga—you're done in 20 minutes. Or consider Mikey Fremer's description of the SME 30/2's ultra-easy assembly and setup in his March review.
The Champion 2's tonearm mounting system is unlike any other I've seen, and not easy to describe or deal with. At the rear right corners of the plinth's two layers are identically sized cutouts. To mount the armboard, one must first place one acrylic collar into the cutout on the top of the upper plinth, then, reaching upside-down between the two plinth layers, hold a second collar against the bottom of the upper plinth's cutout. Next, a machine screw must be threaded through the unthreaded holes in the two collars and a spacing sleeve slipped over said machine screw. At this point, you must try to secure the machine screw into the threaded holes on the bottom of the actual arm-mounting board, which eventually sits atop the aforementioned spacers. Trying to get the short leg of the supplied Allen key between the two plinth layers while simultaneously holding on to the machine screw, bottom collar, and armboard is a task for an octopus. Lots of loose bits have to be assembled from an awkward, upside-down position in a tight space, working against gravity all the way. In short, assembling the Champion 2 was incredibly, infuriatingly difficult. It became somewhat simpler after I'd secured the first two screws to the armboard, as I now needed only two hands instead of three. Still, the first time I attempted it, it took me more than two hours to finally secure all six screws. And the arm still was not installed—just the armboard. After this miserable experience, I threw in the towel and called in the Analog Guru himself, Wally Malewicz of WallyTools fame. A fellow Twin Cities resident, Wally handled all arm installations and cartridge setups on the Champ 2 from there on out (footnote 1).
Footnote 1: With me assisting—mainly by holding the armboard and spacing sleeves while he struggled to insert the screws and get them to grab the armboard—Wally had an easier time of it than I had, but it took him the better part of an hour to get everything assembled and set up. Bringing in an outside expert should not be necessary to successfully set up a medium-priced turntable. Perhaps the revised owner's manual includes some tips for assembly that my early-draft version did not.