| Columns Retired Columns & Blogs |
Fine Tunes #20
This month's episode: First Things First.
I'm on the phone with AudioPrism's Victor Tiscareno. We're talking system basics.
"You know, Jonathan, before folks go out there and spend $3000 on a power cord, they could spend a whole lot less getting the basics right!"
He makes a good point. It's the right way to cover the bases without spending a fortune. The following DIY projects might cost some sweat equity, but they're low in cost, and offer high returns on investment. So let's don our toolbelts, and . . .
Live in a sweet old Victorian with spongy floors that flex like diving boards? Can't play an LP without lunching your stylus? Get some cinderblocks and a couple of trailer leveling jacks and head for the basement. Build up a few cinderblock towers under any weak spots you've identified, heave the trailer jacks on top, and jack it up! You might want to add a small block of 2x4 between the jack and the floor above to spread the load. (Hidden benefit: Now it'll be easier to creep to the 'fridge at night.) Keep in mind, the jack/cinderblock/2x4 sandwich isn't meant to be a load-bearing member; you're merely selectively reinforcing the floor above. This little project might cost anywhere from $50 to a few hundred, depending on your house's construction and layout. Your turntable will love you.
If you've got a suspended floor over crossbeams, as we do in our Manhattan loft, put together a stiffening platform from ¾" MDF. We used two panels, each measuring 5' by 4', butted edge to edge and glued, screwed, and lag-bolted to the floor and the joists below. Paint 'em up in whatever color suits your décor, and you're out only $30 or so for materials. This works wonders as a speaker-and-amp platform. In fact, I've always wanted to do the same under our front-end equipment racks.
A more minimalist, even less expensive approach requires you, a stud finder, and a handful of large Phillips-head self-tapping wood screws. This is especially handy if you have equipment racks or speakers equipped with spikes on an iffy floor. Do some measuring, get down on your knees, and, using the stud finder, locate the joists under the flooring. Having carefully measured spike-to-spike on your audio stands, try to match the spikes to the crossbeam pattern below. Use a power tool to drive in the screws so the heads are ¼" or so above the floor. It'll be harder going into a crossbeam, but that's what you want.
Drive as many screws into those beams as possible. If you get three or even two out of four spikes on each rack matched up with a joist screwhead, that'll be fine. You can do the same with your speakers and level them, as you can the equipment racks, by adjusting screw height for the spikes sitting in them. Just make sure you know where your speakers go before you start drillin'!
A couple more low-cost setup tricks:
Trick One: I've already covered how butcher block improves the sounds of audio components—maple better than oak, for whatever reason. And I've mentioned Symposium Rollerblocks, a somewhat costly footer system using ball bearings in shallow, polished depressions atop aluminum blocks. One worthy on the Net suggests using a Dremel tool to make a trio of 1"-diameter circular depressions in the top surface of a butcher block, then sanding them smooth with 100 and 220 sandpaper. Drop marbles or ball bearings into the depressions, and you've got a reasonably sophisticated equipment shelf for about $40. This particular Netizen suggested painting the butcher block black (I disagree) and placing it on a lightly inflated inner tube (I agree). Place your component on the marbles or bearings and listen for improvements.
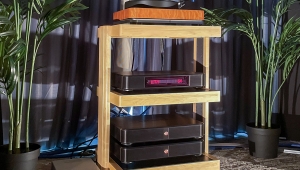
Trick Two: Make your own shelves, or improve on those God gave ya. Let's assume your square-section, hollow-leg rack has thin, rather pedestrian shelves made of MDF—tap one and listen to it rattle.
Constrained-layer damping to the rescue! Get thee to a building-supply outlet and pick up a few steel plates (maybe 16 gauge) somewhat smaller than the shelf you'll use them with. Drill holes in their corners, then glue and screw the plates to the undersides of your component shelves. Tap that bad boy again and you'll be surprised how nonresonant it's become. The steel plate below even provides a modicum of RFI shielding for the component above. And if you're feeling really anal-retentive, run a ground wire from each plate to your system ground.
Alternatively, glue two untreated shelves together. You might try metal plates or another damping material sandwiched between. (It need not be the same size as the shelf; you can just place some around the edges, or in the middle.) Or you can make your own audiophile shelves by bonding together several layers of ¼" MDF, perhaps alternating wood and MDF for maximum damping. And while you're at it, fill those stands with sand. (Use steam-cleaned "pool" sand to avoid varmints and other unwelcome houseguests.) If you want more mass, do what JA does and use a mix of one third No.12 bird shot and two-thirds "play" sand from Toys'R'Us.
NEXT: Letters »
|
| |||||||||
- Log in or register to post comments


| Loudspeakers Amplification Digital Sources | Analog Sources Accessories Featured | Music Columns Retired Columns | Show Reports | Features Latest News Community | Resources Subscriptions |
 © 2024 Stereophile
AVTech Media Americas Inc., USA
All rights reserved