| Columns Retired Columns & Blogs |
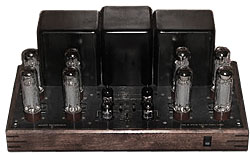
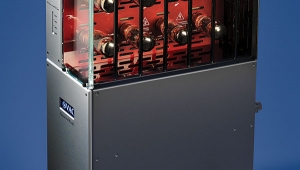
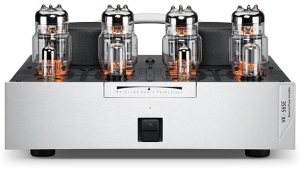
Music Reference RM-9 power amplifier
 Do you believe in beginner's luck? If so, some of your personality traits should be quite predictable. Let's see. You're very likely an optimist with a "bull-market" mentality, play the lottery, and, most important, bought a CD player within a year of its introduction, or a solid-state amp in the '60s. You're apt to mail in a profusion of bingo cards (you know, the kind Stereo Review is full of) and spend hours perusing specifications in the hope of finding a kernel of truth in all of that chaff. You'd particularly be appalled at that fellow I ran into the other day, who had bought an AR-1 in 1956 and waited another decade before buying another speaker—just to make sure stereo wasn't a fad. Hey, relax, I won't turn you in; the mere fact that you're reading Stereophile is sufficient reason for redemption.
The truth of the matter is that the approach to perfection is an evolutionary process. Tube hi-fi amplifiers flourished in the 1950s and '60s. A variety of circuits clashed in the marketplace; only the fittest survived, today regarded as classics of the genre. An example would be the Marantz 8B. Properly upgraded with modern coupling caps, this amp would easily contest the sonic performance of many renaissance tube products. The art advances only by designers standing on the shoulders of past masters, and grasping the essence of their craft before attempting any "improvements."
Apparently, Roger Modjeski, the Patriarch of RAM Labs, did just that. Roger dove into power amps in 1981 after having studied the Futterman OTL design for a number of years while waiting for the patent expiration in 1980. One of his goals was to improve the stock circuit's performance under overload conditions. He points out that, unlike a preamp, a power amp clips quite frequently when driving speakers of average sensitivity to loud SPLs. How so? Well, if you require 10W on average but 20dB headroom to be sure to reproduce piano music adequately, that translates to a 1000W amplifier. So if you're going to clip an amp fairly routinely, recovery from overload becomes an important performance criterion. Roger's finding was that the capacitive coupling of the Futterman caused severe problems during overload. His solution, embodied in the RM-6, was to DC-couple from input to output, and use a DC servo to keep the output signal baseline at 0V. The RM-6 design was sold to Counterpoint and is still available as the Counterpoint SA-4.
The lessons learned from the OTL project were folded in with a prolonged study of early hi-fi amps, starting with the Williamson of the mid-'50s. Modjeski noted several interesting facts about the amplifiers of that era. Almost all of them were low-powered (15–30Wpc), ran a reasonable bias, and sounded musical when not pushed hard. The best of the lot according to Roger—the Marantz and the Hadley—remained stable even under severe clipping. What crystallized out of all this was a tube design philosophy that emphasizes excellent output transformers, straightforward circuitry, and reasonable bias for long tube life. From this framework the RM-9 was born.
The design
The input signal is directly coupled to one-half of a 6DJ8 tube connected as a balanced differential amplifier with the feedback driving the tail-end of the tube. The signal is then DC-coupled to another 6DJ8 differential amplifier. From here the signal is AC-coupled, using a pair of 0.22;uF WonderCaps to the grids of a quartet of EL34s operating in push-pull mode. The two quartets of output tubes provided are tested and matched by RAM Tube Works to within less than 10% variation in both bias operating point and transconductance. Thus only a single bias-adjustment pot and LED are necessary for each quartet of output tubes. As Modjeski points out, matched tubes would be advantageous even in designs with separate bias adjustments for each output tube, because the bias will track from tube to tube as the tubes age so that the load will be equally distributed among the output tubes, the result being an increase in tube life and sonic performance. A driver balance-adjustment pot and LED monitor for each channel are also provided. The screen grids of the output tubes are connected in "ultra-linear" fashion to the output transformer, being at 40% of anode voltage. Hence, the transfer characteristics of the output stage are intermediate between those of a tetrode and those of a triode.
When I first read about 10,000-hour tube-life in the Music Reference literature, I felt that surely this was a typo. After all, there are tube amplifiers out there today with tubes that kick the bucket after only 1000 hours. For most users, 10,000 hours represent about a decade of listening (at roughly 3 hours per day). But MR tells me that it's really true; welcome news indeed! It means that the average cost of re-tubing the RM-9 should be quite minimal when prorated over its lifetime. The reason for the longevity of the RM-9 output tubes is that the bias is set at about 30 milliamps, which results in extremely conservative plate dissipation and cool-running tubes.
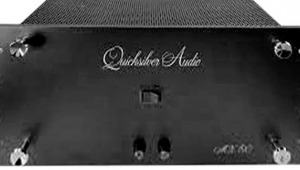
The output transformers are quite beefy, accounting for over a third of the amp's weight. They use 10 pounds each of silicon steel, are hand-wound and -stacked, and are potted under vacuum in silicone rubber. Taps are provided for 2, 4, and 8 ohm nominal loads via brass terminals. These terminals will accept bare wire (wrapped around the post), or preferably spade lugs. A tertiary winding is used to provide negative feedback to the driver stage while improving stability into highly reactive loads. The amount of feedback and hence overall gain is selectable via a 3-position toggle switch located under the tube cage where all of the adjustment pots are conveniently positioned as well (all of these, by the way, may be accessed without any fear of singed fingers). You may select 10, 14, or 19dB of feedback during listening so that you can fine-tune the amp/speaker interface. The available gain decreases with feedback from 36dB to 27dB. The switch designations of "LO," "HI," and "MED" refer to the amount of gain available. In the HI gain setting, along with a high-gain preamp such as the Music Reference RM-5 or the Counterpoint SA-7, it is possible to accommodate even low-output MC cartridges (0.5mV nominal output) without an additional step-up device.
The power supply provides a main B+ voltage of 450V and uses solid-state rectification. Reservoir capacity is 800µF and features four Rubycon photoflash caps. The main circuit board is accessible through the bottom plate. You'd normally only want to do that when replacing a fuse. But being of an inquisitive mind, I naturally just had to take a peek. Parts and construction qualities are high.
An added dimension of the RM-9 is its ability to readily accept both KT88 and 6550 output tubes. You simply retube, then readjust the bias to 30mA using the same procedure as before: the bias pot is rotated counterclockwise to extinguish the LED, then the bias is raised by the clockwise rotation of the pot until the LED just lights. The stock version of the RM-9 is fitted with EL34s because, when the amp was released, KT88s were an endangered species; besides, Modjeski really likes the EL-34. This is no small matter, however, and, as you shall see shortly, the choice of output tubes greatly affects the sonic character of the amp.
As an added measure of flexibility, you should know that the RM-9 may be bridged for a whopping 200Wpc. I haven't tried this yet, but would like to—possibly as a follow-up to this review.
Sonic impressions
It occurred to me that the RM-9's model designation may actually refer to its nine lives or incarnations: three output stages times three gain settings for a total of nine permutations. Roger, is there any truth to that? In any event, I applaud the versatility the amp affords. However, from a reviewer's standpoint it all represents extra work for probably no additional pay.
My first impressions of the RM-9 were all with what I will call the stock version—the one with the EL-34 output stage. Because the KT88 version turned out to be much more entertaining musically, I will condense my description of the stock version to eliminate the usual blow-by-blow description in favor of a summary, which I will use as a jumping board to elucidate the virtues of the KT88 version.
I found it important to experiment with the GAIN setting. There wasn't a consistently best setting for all loads. For example, with my own Dahlia-Debra loudspeakers, the high-gain setting yielded the more natural upper octaves but at the expense of a slight veiling of the soundstage. The low-gain setting resulted in a slight brightness. The best compromise was reached with the medium setting. Here the upper octaves were well-behaved, and the mids most transparent.
NEXT: Page 2 »
|
|
| ||||||||||
- Log in or register to post comments


| Loudspeakers Amplification Digital Sources | Analog Sources Accessories Featured | Music Columns Retired Columns | Show Reports | Features Latest News Community | Resources Subscriptions |
 © 2024 Stereophile
AVTech Media Americas Inc., USA
All rights reserved